


Ghost Types
Each of the Ghosts in the game and their behaviours
1. Spirit
Spirits are a boring Ghost, they only have one distinguishable feature and it’s that it can not hunt for 3 minutes after being smudged by incense, which is more than the normal ghost.
Evidences: Spirit Box, Ultraviolet, D.O.T.SHunts at: 50% SanitySpeed: 1.7m/s
2. Wraith
The Wraith is a floating Ghost, therefore it will never step in salt, they also don’t have an ultraviolet footprint. The Wraith can teleport to a player silently but will emit an EMF reading to wherever it teleports, and then goes back to its ghost room possibly interacting with things on its way back.
Evidences: EMF 5, Spirit Box, D.O.T.SHunts at: 50% SanitySpeed: 1.7m/s
3. Phantom
When you take a photo of this Ghost it will disappear temporarily during a hunt and completely during D.O.T.S, it also won’t appear on the ghost photo. A Phantom will also have a heavier toll on your sanity when looking at it. It stays considerably less visible during a hunt. It will follow the ghost hunters around too, so it’s said to keep each player near the ghost room to make collecting pieces of evidence easier. During a Hunt, if the Phantom can see you and you're within 10 meters of it, you lose 0.5 sanity per second.
Evidences: Spirit Box, Ultraviolet, D.O.T.SHunts at: 50% SanitySpeed: 1.7m/s
4. Poltergeist
Poltergeists are like spoilt children not getting what they want in a store, they will throw objects around more frequently, draining the player's sanity by 2% per object during their special ability which is throwing many objects at once like an explosion. A good way to find out if it’s a Poltergeist, make a pile of objects in one area, or watch the Ghost throw objects around it when hunting as it is guaranteed every 0.5 seconds.
Evidences: Spirit Box, Ultraviolet, Ghost WritingHunts at: 50% SanitySpeed: 1.7m/s
5. Banshee
Banshee is known as the wailing ghost. Screams can be heard on the Parabolic Microphone. The Banshee weakens its targets before hunting, causing one player's sanity to decrease faster than the rest and making it the primary target during hunts, rather than targeting whoever is easier. The Banshee cannot hunt if the targeted player is above 50% sanity. If the Banshee performs a singing event and collides with the target, they lose 15% of their sanity.
Evidences: Ultraviolet, Ghost Orbs, D.O.T.SHunts at: 50% SanitySpeed: 1.7m/s
6. Jinn
The Jinn is a power-eccentric ghost. It will never turn off the breaker. It will travel faster if the player is more than 3 meters away, and the breaker is on, and if the player is in line of sight. When chasing someone, it can drain a player's sanity by 25% and emit an EMF level at the breaker.
Evidences: EMF 5, Ultraviolet, Freezing TemperatureHunts at: 50% SanityFastest Speed: 2.5m/s
Slowest Speed: 1.7m/s
7. Mare
Mare is the reason some children are afraid of the dark, it has an increased chance to hunt in the in the dark (60%) and a lesser chance with the lights on (40%). The Mare has a chance to immediately turn off the light the second the player turns it on. The Mare also has a favourite Ghost Event which is exploding the lightbulb. It will also never turn on a light.
Evidences: Spirit Box, Ghost Orbs, Ghost WritingHunts at: 60-40% SanitySpeed: 1.7m/s
8. Revenant
Revenant will travel faster when chasing a player, meaning if your location isn’t known, the Revenant will be slowed down. The Revenant is very simple but is very dangerous, make sure to have a hiding spot memorised at all times.
Evidences: Ghost Orbs, Ghost Writing, Freezing Temperature
Hunts at: 50% Sanity
Chasing Speed: 3m/s
Idle Speed: 1m/s
9. Shade
Now like the Phantom, this ghost is shy but not in the same way, it doesn’t provide evidence or events as much as other ghosts and will not hunt if there are players in the same room as it. If the Ghost does perform an event, it’s more likely to be the shadow form event where it appears as a silhouette. It will not throw objects, interact, hunt or do anything if you are in the same room.
Evidences: EMF 5, Ghost Writing, Freezing Temperature
Hunts at: 35% Sanity
Speed: 1.7m/s
10. Demon
It’s a Demon, it sounds aggressive. Demons have a reduced hunt cooldown so they can hunt more frequently, this doesn’t mean they will and they can hunt earlier than the average ghost at 70%, but also fears the Crucifix more than others as the range is 1.5x more. Demons will also have a shorter smudge duration from 90 seconds to 60.
Evidences: Ultraviolet, Ghost Writing, Freezing Temperature
Hunts at: 70% Sanity
Speed: 1.7m/s
11. Yurei
Yurei is a very dangerous ghost due to the effect it has on a player's sanity, it’s also more likely to fully close a door and is the only ghost that can close an exit door outside of a hunt. The Yurei has a special ability to remove 15% of your sanity when slamming a door.
Evidences: Ghost Orbs, Freezing Temperature, D.O.T.S
Hunts at: 50% Sanity
Speed: 1.7m/s
12. Oni
The Oni is the strongest ghost as it deducts your sanity more than anybody else. The Oni is more active when a player is nearby, and drains your sanity faster when it’s manifesting. Oni’s will stay visible more/blink less during a hunt, which is the complete opposite of a phantom. An Oni also can’t do the airball ability which is when a little ball floats towards the player. The Oni does double in almost all sanity deductions.
Evidences: EMF 5, Freezing Temperature, D.O.T.S
Hunts at: 50% Sanity
Speed: 1.7m/s
13. Yokai
Yokai is like a strict teacher, if it hears you talking, it angers it, but unlike a teacher, it has terrible hearing and can only hear voices near it. Like the voices, your equipment can’t be detected when 2.5 meters away from the ghost. Another thing is that the Music Box won’t break as easily and cause a hunt with this ghost.
Evidences: Spirit Box, Ghost Orbs, D.O.T.S
Hunts at: 50% Sanity
Speed: 1.7m/s
14. Hantu
At lower temperatures, the Hantu is faster by nearly double the regular speed, but this also means it is slower in warmer areas. Depending on the temperature, the speed can vary from 1.4m/s to 2.7m/s. Guaranteed Freezing Temperature. You can see its freezing breath during a hunt.
Evidences: Ultraviolet, Ghost Orbs, Freezing Temperature
Hunts at: 50% Sanity
Max Cold Speed: 2.7m/s
Regular Temp Speed: 1.4m/s
15. Goryo
The Goryo is another type of shy ghost, it will not appear on D.O.T.S if it’s not on camera and it has to have nobody in the room with it. Another thing is, it doesn’t stray far from the Ghost Room. Will never change ghost rooms regardless of if it’s possible in the difficulty. Guaranteed D.O.T.S evidence.
Evidences: EMF 5, Ultraviolet, D.O.T.S
Hunts at: 50% Sanity
Speed: 1.7m/s
16. Myling
Unlike the majority of Phasmophobia players, Myling is a quiet ghost and you will not be able to hear it past a certain point during a hunt, this point being 12 meters. The Myling can also produce more frequent paranormal sounds through the Parabolic Microphone.
Evidences: EMF 5, Ultraviolet, Ghost Writing
Hunts at: 50% Sanity
Speed: 1.7m/s
17. Onryo
The Onryo can begin hunting after it extinguishes a fire 3 times regardless of the sanity or setup period, not restricted to lanterns but also campfires and lighters. The fire also acts as a crucifix and will not hunt near a lit fire.
Evidences: Spirit Box, Ghost Orbs, Freezing Temperature
Hunts at: 60% Sanity
Speed: 1.7m/s
18. The Twins
There is only one ghost but it can vary from interacting within 3 meters away, or within 16 meters away, has a 50% chance to teleport before the hunt to the further away interaction and if it does then it will be the faster variant of itself. The Twins also allegedly have a neat activity chart and have a weird curve more frequently than other ghosts.
Evidences: EMF 5, Spirit Box, Freezing Temperature
Hunts at: 50% Sanity
Faster Speed: 1.87m/s
Slower Speed: 1.53m/s
19. Raiju
The Raiju can take power from electrical devices that increase its speed, and the range they disrupt devices is increased.
Evidences: EMF 5, Ghost Orbs, D.O.T.SHunts at: 50% SanityPowered Speed: 2.5m/s
Regular Speed: 1.7m/s
20. Obake
Obake are shapeshifters, which means it can have 6-fingered fingerprints, which is handy as their fingerprints are guaranteed regardless of if it’s the hidden evidence. It can also change ghost models briefly during hunts.
Evidences: EMF 5, Ultraviolet, Ghost Orbs
Hunts at: 50% Sanity
Speed: 1.7m/s
21. The Mimic
The Mimic is a copycat ghost, it will copy the behaviour of another ghost type at least once every 2 minutes, however, the Mimic can not change the copied ghost during a hunt. Ghost Orbs will also appear in the ghost room but it is not one of the evidence the Ghost has.
Evidences: Spirit Box, Ultraviolet, Freezing Temperature (and Ghost Orbs)It will hunt the same way as the Ghost it mimicsIt will mimics a Ghost’s Speed
22. Moroi
The Moroi feeds on the weakness of the players, it gets faster when the average sanity is lower. A Moroi will curse a player who gets a Spirit Box answer or a Parabolic Microphone audio by doubling the sanity drain. Your lights and candles will not stop the cursed sanity drain, but can be removed by taking sanity pills. Smudging the Moroi will also confuse the ghost for 7.5 seconds. They will also have guaranteed Spirit Box evidence, regardless of if it’s hidden.
Evidences: Spirit Box, Ghost Writing, Freezing TemperatureHunts at: 50% SanityFastest Speed: 3.71m/s
Regular Speed: 1/5m/s
23. Deogen
The Deogen can sense your presence no matter where you hide, if they always find you, no matter how well you hide, this might be a Deogen. The Deogen is fast when travelling to your location but when within 2.5 meters of you it will become really slow. Deogens also can not start hunts early, usually only triggering one when the average sanity is below 40. The Deogen is a guaranteed spirit box evidence regardless of whether the Spirit Box is the hidden evidence, and the Deogen can respond by just breathing heavily and taking steps towards you.
Evidences: Spirit Box, Ghost Writing, D.O.T.SHunts at: 40% SanityClose Speed: 0.4m/s
Far Speed: 3m/s
24. Thaye
The Thaye is the polar opposite to the the Shade but eventually ends up like the Shade, it starts off really active and can hunt at 75% when at a young age but ages over time and loses it's power and aggressiveness and starts hunting at 15% sanity. The Thaye gains age when a player is nearby, eventually getting weaker and weaker. You can ask this ghost for it's age on the Ouija Board and it will change.
Evidences: Ghost Orbs, Ghost Writing, D.O.T.SHunts at: 75-15% SanityYoungest Speed: 2.75m/s
Oldest Speed: 1m/s
Items
Each item in the game, and what they do
D.O.T.S Projector
This item produces a field of green dots that reveal the ghost's location if they have it as evidence and are in a D.O.T.S state. Tier 1 is a laser pointer with a narrow light and it's handheld. Tier 2 is placeable on walls and floors and scans one area. Tier 3 is the same but scans from left to right with more range.EMF Reader
An EMF reader will state the activity levels in an area, and depending on what variant will tell you where it's coming from. Tier 1 is old and doesn't have good accuracy and is hard to read. Tier 2 is a major improvement and has a noise indicator, more range and it's accurate. Tier 3 is the same as Tier 2 but on a display screen with more range and directional indicators.
EMF 5 - Evidence Interaction (25% Chance)
EMF 4 - Manifestation/Event
EMF 3 - Threw an Object
EMF 2 - Interacted with Object
EMF 1 - No Paranormal ActivityGhost Writing Book
This item will be useful for collecting the Ghost Writing evidence, it will display different drawings depending on what tier of the item you are using. Each book gets more range and a better response rate as the tier goes up.Spirit Box
Will allow you to talk with the ghost and find out things with the ghost while also collecting evidence. Just like the book, each tier gets better and has a better response rate and audio quality.
Thermometer
Tells you the temperature of the area you're standing in, tier 1 is deemed the best by the community as it can be used while not in the ghost room but has a slower read-out. If it's below 0°C or 32F, then that's evidence. Tier 2 has better sample speed and good accuracy, and Tier 3 is even better however you have to stay in the ghost room repeatedly scanning.UV Light
The ultraviolet light can find handprints, fingerprints and footprints from ghosts, ultraviolet is evidence! Tier 1 is a glowstick, and it's arguably the best but the UV charge time is a lot higher than the other two. Tier 2 is a flashlight with ultraviolet light, and the charge time is halved. Tier 3 is arguably the best as the spotlight is wide and the charge time is less than 2 seconds.Video Camera
Can be planted in a room with or without a tripod to view that room from the van, used for finding ghost orbs in night vision. Tier 1 of this tool has bad image quality and the ghost can easily mess with the visuals. Tier 2 and 3 get better with image quality and the paranormal interference is lessened.Crucifix
Can prevent a hunt if the ghost tries hunting within a vicinity, this is shown with an almost transparent field shown when placing the Crucifix. Tier 1 can stop 1 regular hunt, Tier 2 can stop 2 regular hunts, and Tier 3 can stop 2 regular hunts OR 1 cursed hunt.Firelight
A lantern/candle that lights up an area and can be useful for more than just illuminating your way, it can be useful in finding out the ghost type with behaviours. Tier 1 is a candle that lasts 3 minutes, and reduces sanity drain by 33%. Tier 2 is a three candles in one that does the same but 2 minutes longer and 50% sanity drain reduction. Tier 3 is a lantern that is waterproof and reduces sanity drain by 66%.Flashlight
Lights up your path. Tier 1 is a dim narrow light. Tier 2 is a little bit better but just as narrow. Tier 3 is a major improvement as it's bright and has a wide light.Head Gear
Tier 1 is a head camera that works the same as a video camera. Tier 2 is a headlight that works like a tier 2 flashlight. Tier 3 is night vision goggles. These will not take up an inventory spot.Igniter
Tier 1 is a matchbox, with only 10 uses. Tier 2 is a regular lighter. Tier 3 is a waterproof lighter.Motion Sensor
Detects the motion of the ghost or person depending on the tier and displays a sound that can be heard from in the van or inside if you're close enough. Each tier gets better as it gains more features and different sensor shapes.Parabolic Microphone
In case you're deaf or want to hear more than the natural noise, you can use this gear to easily hear more things or find the ghost room easier on bigger maps. Each one gets better due to range and tier 3 gains a distance indicator and directional indicator.Photo Camera
Say Cheese! Take a photo of certain things to gain more money and xp, like the ghost, a dead body, evidence like ghost writing and fingerprints, walking in salt or even a cursed possession. The only major difference in tiers is the time between photos and tiers 2 and 3 having a display screen.Incense
The Incense can be a very useful item, the smudge effect is only used once per stick so apply it when necessary. Incense blinds the Ghost during a hunt for 5 seconds, and cleanses the area to prevent hunts for 90 seconds (60 for Demon and 180 for Spirit). Tier 1 is a black sage bundle, it has a range of 3-meters and burns for 5 seconds. Tier 2 is a second and meter longer and slows the ghost. Tier 3 is a second and meter longer and also freezes the ghost in place rather than slowing it down during it's smudge effect.Salt
Salt allows you to find the ghost location a little easier and cross out if it's a Wraith. Tier 1 is regular kitchen salt with 2 uses. Tier 2 is a Himalayan salt which has 3 uses. Tier 3 is also 3 uses and is black salt which slows the ghost during a hunt by half for 2 seconds and knocks them back when outside of a hunt.Sanity Medication
Pop some pills and your problems go away.. at least in this game, it does. This medication will increase your sanity making the game slightly more easier. They all do the same thing but with faster effects, getting 10 seconds faster each time. Tier 3 gives you 10 seconds of infinite sprint.Sound Sensor
Place it down and hear things from within the van. Tier 1 has a range of 5-10 meters and an area of a circle. Tier 2 has a 5-10-15 meter range, also shaped like a circle. Tier 3 has a range of 5-10-15 and has several shapes, a circle, cone and double the sides of the sensor.Tripod
Add more stability to your camera to stop the ghost from knocking over your camera as frequently, as the tiers go up the more stable they are, and tiers 2 and 3 also allow you to rotate the camera from within the van. The better the tier, the less chance it has to be knocked over.

Evidences
Each Evidence in the game, and how to get them
EMF Level 5
Can be found using the EMF Reader tool. A ghost produces EMF Level 5 when it interacts with anything in the room or the Ouija Board sometimes. Each tier of EMF readers displays differently.
Ultraviolet
Left on objects in the room by a ghost, seen by using the UV Lights or Glowstick.This does not count footprints left by the ghost through salt.
Ghost Writing
Determined using the Ghost Writing Book. If the ghost writes in the book, this is a piece of Evidence for that ghost type.
Freezing Temperatures
Determined by using the thermometer. Temperatures decrease in the room where the ghost spends most of its time. If Freezing Temperatures are a piece of evidence for the ghost type, temperatures in the ghost room will drop three times as fast. If Freezing Temperatures are not a piece of evidence for the ghost type, the room the ghost occupies will only ever reach 1-5°C. If it goes below 0°C or 30.2F Fahrenheit, it's freezing temperatures.
D.O.T.S Projector
If D.O.T.S is evidence, when the ghost walks through a D.O.T.S Projector and they're in a D.O.T.S state, they will show up as a transparent green figure, and may appear more white in night vision.
Spirit Box
An item used to communicate with the ghost. When the player asks questions near the ghost, if the ghost answers, Spirit Box is Evidence for the ghost type.Red dots mean the game has picked up your microphone input. White dots mean the ghost has responded if you didn't hear them.
Ghost Orbs
A small, floating orb is seen using a Video Camera or Head-Mounted Camera with night vision.It's suggested you turn off any body lights when viewing the camera in the truck as it may cause glare.
Spirit Box Questions
All the questions you can say to get an answer out of the Ghost
• Hello?
• Are you with us?
• Can we help?
• Can you give me your name?
• Can you show yourself?
• Can you talk?
• Do you want to hurt us?
• Do you want us here?
• Do you want us to leave?
• Give us a sign!
• Let us know you are here.
• Shall we leave?
• Should we leave?
• Show yourself!
• Speak to us!
• What are you?
• What do you want?
• What should we do?
• Where are you?
• Why are you here?
• How old/young are you?
• Are you a boy/man/girl/woman/male/female?
• Are you male or female?
• Are you old/young?
• Are you a child?
• Are you close?
• Are you friendly?
• Are you here?
• Are you angry?
• Anybody here?
• Anybody in the room?
• Anybody with us?
• Is anyone here?
• Is there a ghost here?
• Is there a spirit here?
• When were you born?
• Who am I talking to?
• Who are we talking to?
• Who are you?
• Who is this?
• What is your age?
• What is your gender?
• What is your location?
• What is your name?
• Are you Pizza?
• Are you French?

Cursed Possessions
Each of the Cursed Items in the game
Music Box
When picked up, the music box will open.
The music box can then be activated by using the primary use key. Doing so will end the setup phase early if it is ongoing. The music box cannot be activated during a hunt, and can only be used once.Being within 2.5 metres of an active music box drains sanity by 2.5% per second.Once activated, if the ghost is within 20 metres of the music box, it will sing along, broadcasting its current location while remaining invisible.If the music box is within 5 metres of the ghost, it will trigger a ghost event where the ghost manifests and begins to walk towards the box. The music box can be handheld or placed on the floor, the latter being the only safe way to discard the box without triggering a cursed hunt before the ghost event. In all cases, the box will close once it stops playing.
Haunted Mirror
The mirror can be toggled while inside the building. When activated, the haunted mirror will show a part of the ghost room an allowing players to locate the room. This view is a live feed of the room, so any lights turned on, items moved, and equipment or players present in the room will be visible.Each usage of the haunted mirror drains sanity at a rate of 7.5% per second, or 20% per use, whichever is higher. This means that using the mirror for less than ~2.67 seconds will still drain at least 20% of sanity. This includes the animation of raising, but not lowering, the mirror. If the user's sanity reaches zero, the mirror will crack visually and audibly, and the ghost will start a cursed hunt from its current position. The mirror cannot be used again.
Summoning Circle
The summoning circle can be used by lighting all five red candles with an igniter. Each candle deducts 16% of sanity for nearby players, leading to a total of 80% being deducted for all candles.Once all five candles are lit, the ghost is summoned and fully materialized, except a Shade, which has a chance of appearing as a transparent shadow. The summoned ghost stays motionless for about 5 seconds, unable to kill players. This stationary period is considered a ghost event. However, the front door will lock immediately after lighting the last candle. After this "grace period", it immediately initiates a cursed hunt on the spot, without an additional 1 second grace period. Once the summoning circle is activated, it cannot be used again.If used during a hunt, it will teleport the ghost to the circle regardless of where it was prior.
Tarot Cards
Each Tarot cards deck contains 10 randomly generated cards. There are 10 possible card types the player can draw, each having a unique effect on either the player or the ghost. After being used, each card will burn up and vanish in a uniquely coloured flame. Each card type has a different, independent chance of being drawn, so some card types can be drawn multiple times or not at all in a single deck.Once all ten cards have been used, no more will be given to the player for that contract. When the deck is used up, all future hunts will also be extended by 20 seconds, even if no Death card was drawn prior.
Voodoo Doll
Interacting with the voodoo doll will cause one of the 10 pins stuck in the doll to be pushed into it at random. This will cause the ghost to perform an interaction and will drop the user's sanity by 5%. These forced interactions can include evidence sources like EMF Level 5, touching doors, windows, and light switches for Fingerprints.If the heart pin is pressed down the user's sanity will drain by 10%, and the ghost will initiate a cursed hunt. If the user's sanity is less than the amount that the pressed pin would drain, all remaining pins will be pushed in and a cursed hunt will occur.
Monkey Paw
The Monkey Paw grants up to a certain number of wishes depending on the difficulty reward multiplier:
> • 0x – 1.99x: 5 wishes
> • 2x – 2.99x: 4 wishes
> • 3x or higher: 3 wishesUpon entering the investigation area, the Monkey Paw's fingers will twitch, indicating it is ready to receive a prompt, and players can choose to either use voice chat or a text-based UI to make wishes.
Ouija Questions
Each of these questions will drain your sanity, the more useful ones drain it faster, 5% to 50% sanity drain
All thse questions will tell you the location of the Ghost Room
• "Where are you?"
• "What is your favorite room?"
• "Where is your room?"
• "What is your room?"These will tell you the location of the bone.
• "Where is the bone?"
• "Where did you die?"
• "Where is your body?"Tells you your sanity without going back to the van.
• "What is my sanity?"Tells you the age of the ghost, good for tracking down a Thaye.
• "How old are you?"
• "What is your age?"
• "Are you old?"
• "Are you young?"This will tell you if the ghost is in the same room as you, letter by letter.
• "Are you here?"
• "Are you close?"The number of people in the ghost room.
• "How many are in this room?"
• "How many people are in this room?"
• "How many people are here?"
• "How many ghosts are in this room?"
• "How many ghosts are here?"
• "Are you alone?"
• "Are we alone?"
• "Who is here?"
• "Who is in this room?"
• "How many ghosts are present?"
• "How many people are present?"Date of ghosts death.
• "How long have you been dead?"
• "How many years ago did you die?"
• "How long have you been here?"
• "How long ago did you die?"
• "When did you die?"This will tell you if it's a shy ghost who only responds to people alone or not with Spirit Box.
• "Do you respond to everyone?"Initiates a cursed hunt after 5 seconds, hide.
• "Do you want to play hide and seek?"
• "Hide and seek?"Some jokes with the ghost.. why though?
• "Knock knock"
• "Marco"
• "How many pickles can you fit up your butt/ass?"The purpose of why the ghost exists.
• "Why are you here?"
• "What do you want?"Kinda Useless
• "How many people did you kill?"
• "How did you die?"
• "How do you feel?"
• "Are you okay?"
• "How are you?"
Tarot Card Meanings
The Tower (20%)
• Causes an interaction and ghost activity has double chances to happen for 20 seconds.Wheel of Fortune (20%)
• Green - 25 Sanity Gain
• Red - 25 Sanity LossThe Fool (17%)
• No effect.
• All Cards during a hunt are fools.Death (10%)
• Triggers a Cursed Hunt.The Devil (10%)
• Triggers a Ghost Event.The Hermit (10%)
• Traps the ghost in the ghost room for a minute.The Sun (5%)
• Your sanity is now 100.The Moon (5%)
• Your sanity is now 0.High Priestess (2%)
• Resurrects a random dead player, if nobody is dead, the next person to die will be brought back.Hanged Man (1%)
• Kills the player.
Monkey-Paw Demands
• "I wish to see the ghost"
Will trigger a ghost event, the ghost will appear and your vision will be foggy, after 5 seconds a cursed hunt will begin and your vision will only return after the hunt ends.• "I wish for activity"
• "I wish the ghost would do something"
Doubles the ghost activity for 2 minutes, and the fuse box will break and the exit door will be locked for the duration of the activity.• "I wish to trap the ghost"
• "I wish the ghost was trapped"
Traps the ghost in its room for a minute while also locking you inside the room you're currently in for a minute. After this, a cursed hunt will begin and all doors will unlock except the exit doors, 25% chance the doors only unlock after the grace period ends.• "I wish to be sane"
• "I wish for sanity"
Will set every player's sanity to 50% and your drain speed will be decreased, however, the ghost room will randomise.• "I wish to be safe"
Will open up the nearest hiding spot, lights in the room will shatter however you will be more audible to the ghost and all electronics will be detected regardless of distance.• "I wish to leave"
Unlocks the exit door, even during a hunt but your speed and vision are reduced for 5 seconds.• "I wish to revive my friend"
• "I wish for life"
One dead player will be revived however there's a 50/50 you take their place in Purgatory.• "I wish for knowledge"
Will smudge one invalid evidence and corresponding ghosts from your journal, but will start a hunt near you and your audio and vision will be muffled permanently, making you almost blind and deaf.• "I wish for sun/rain/clear sky/fog/snow/wind"
Will set the weather to your desire but will cause temporary blindness and your sanity will be reduced by 25. Wishing for rain is a 50/50 between light and heavy rain.• "I wish for anything"
A Russian roulette between each wish above.

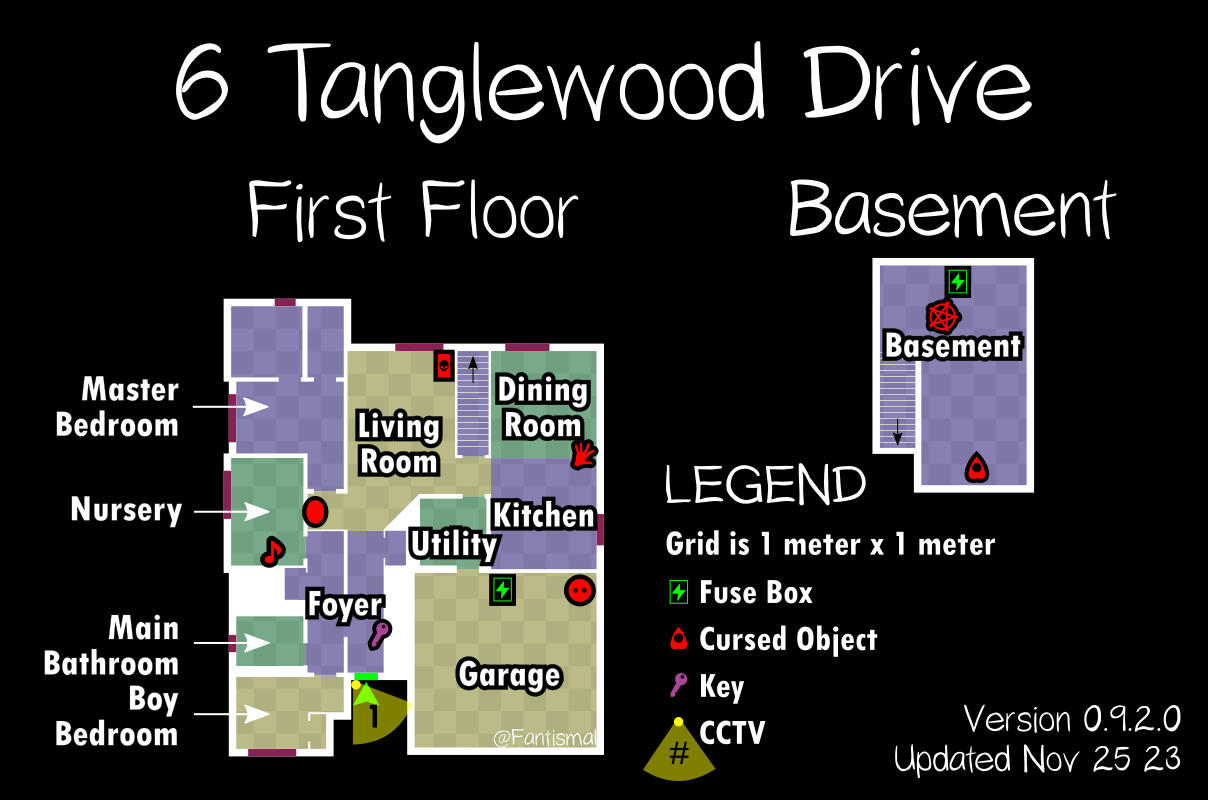
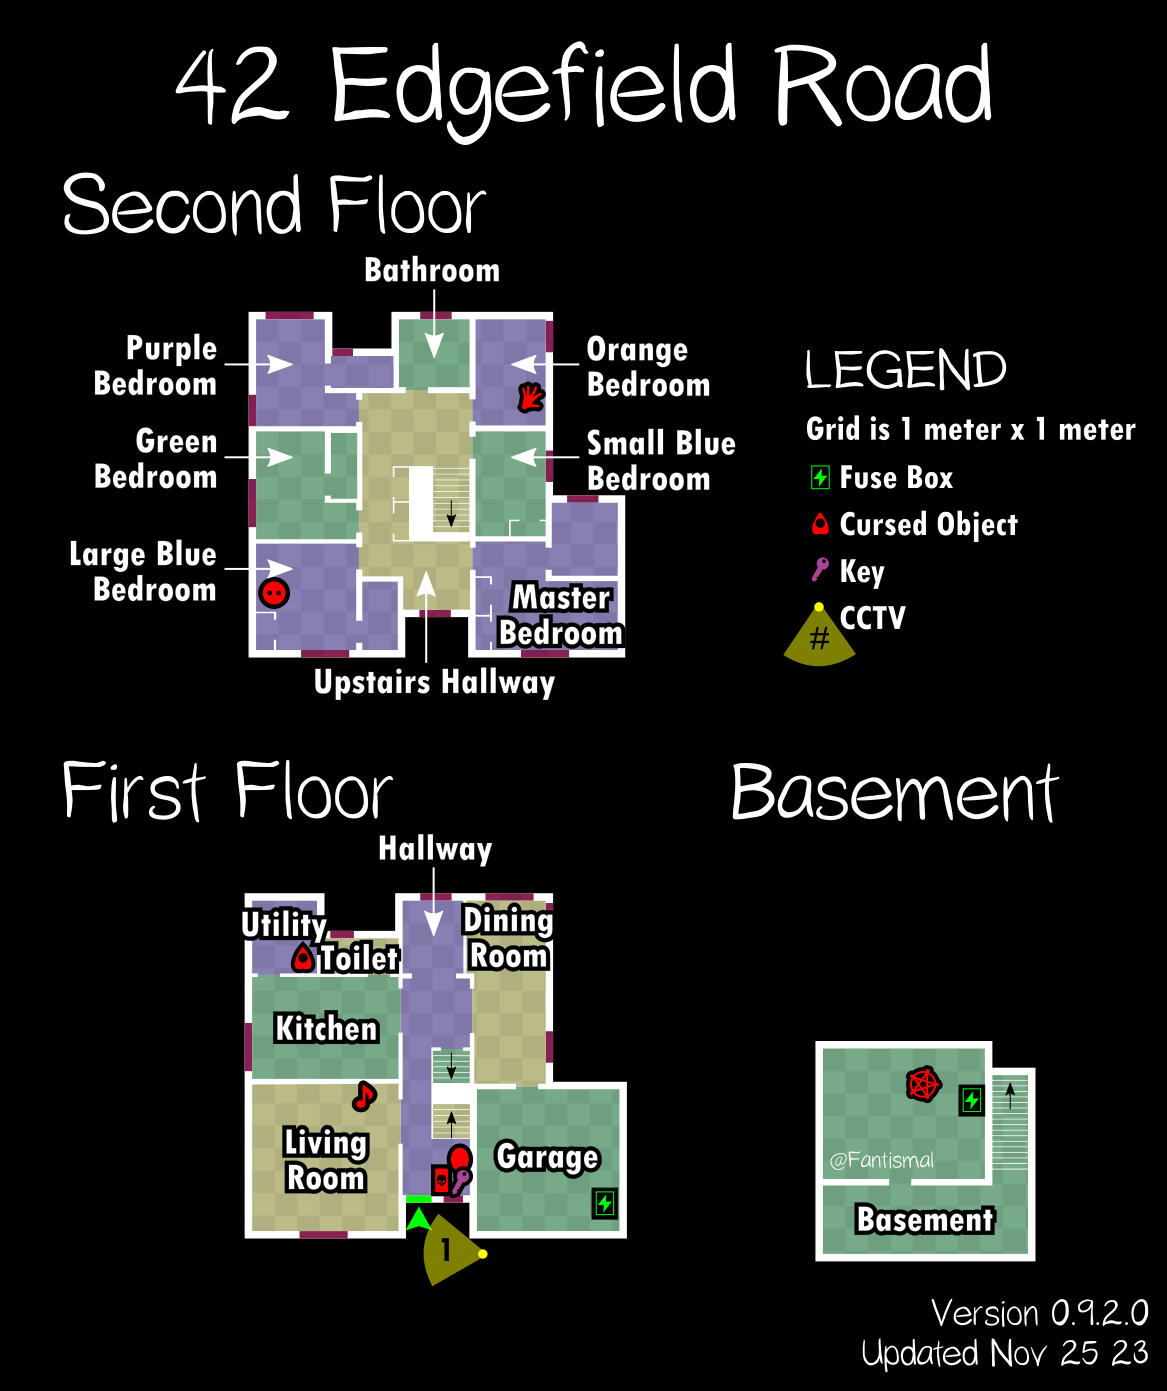
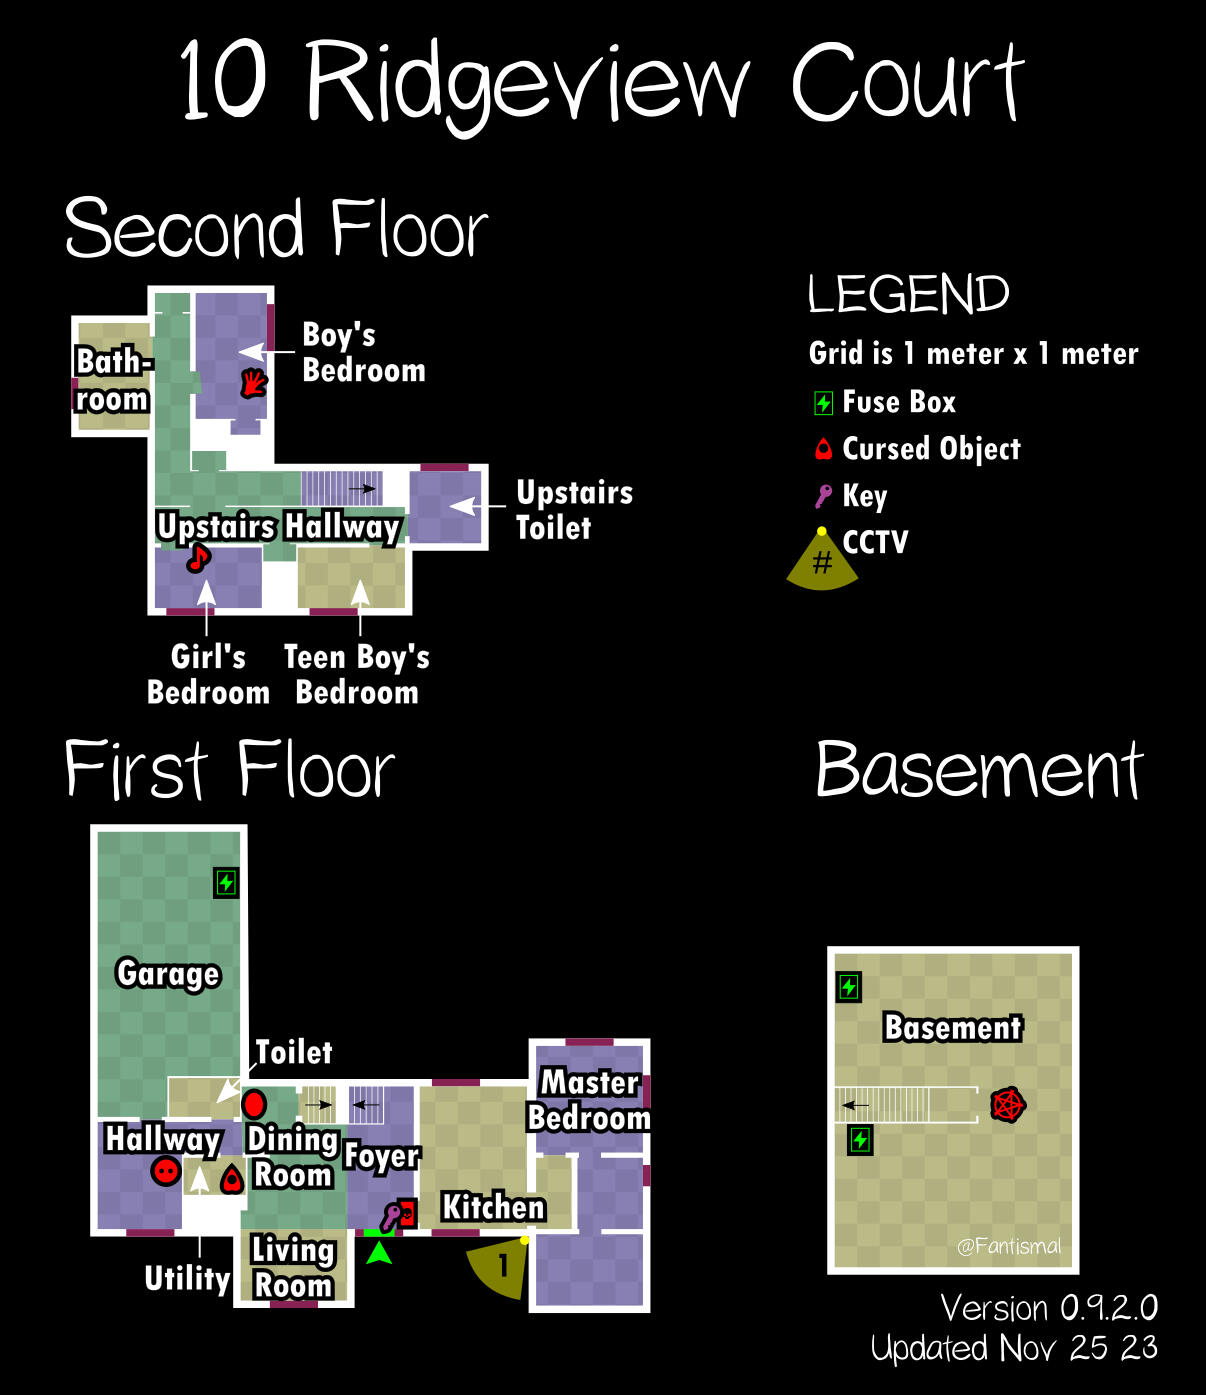
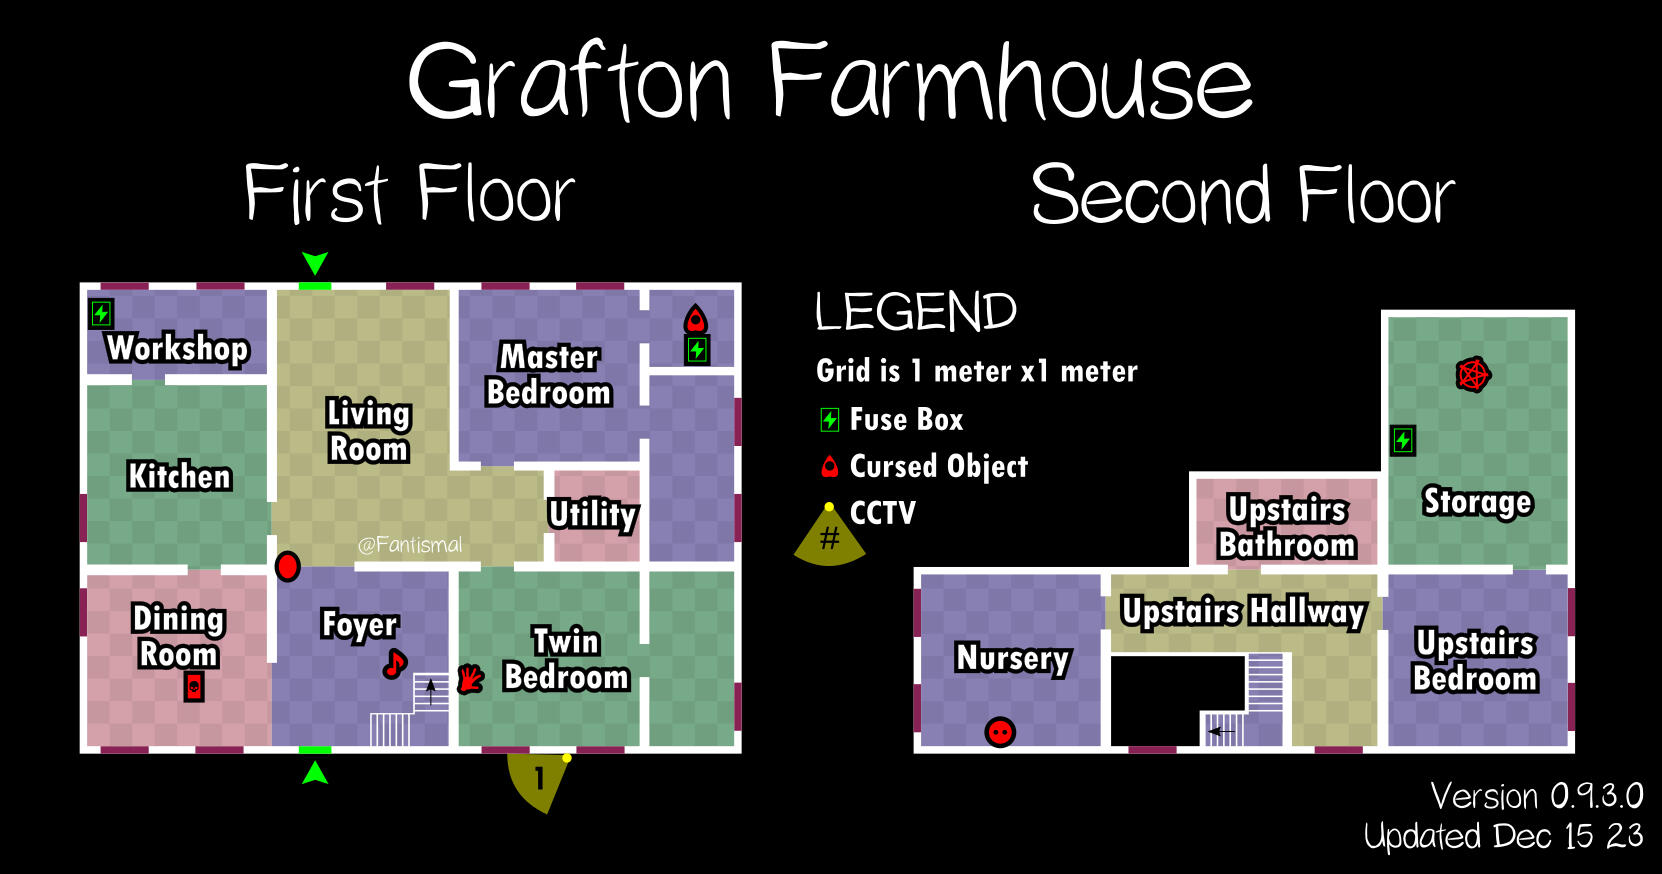
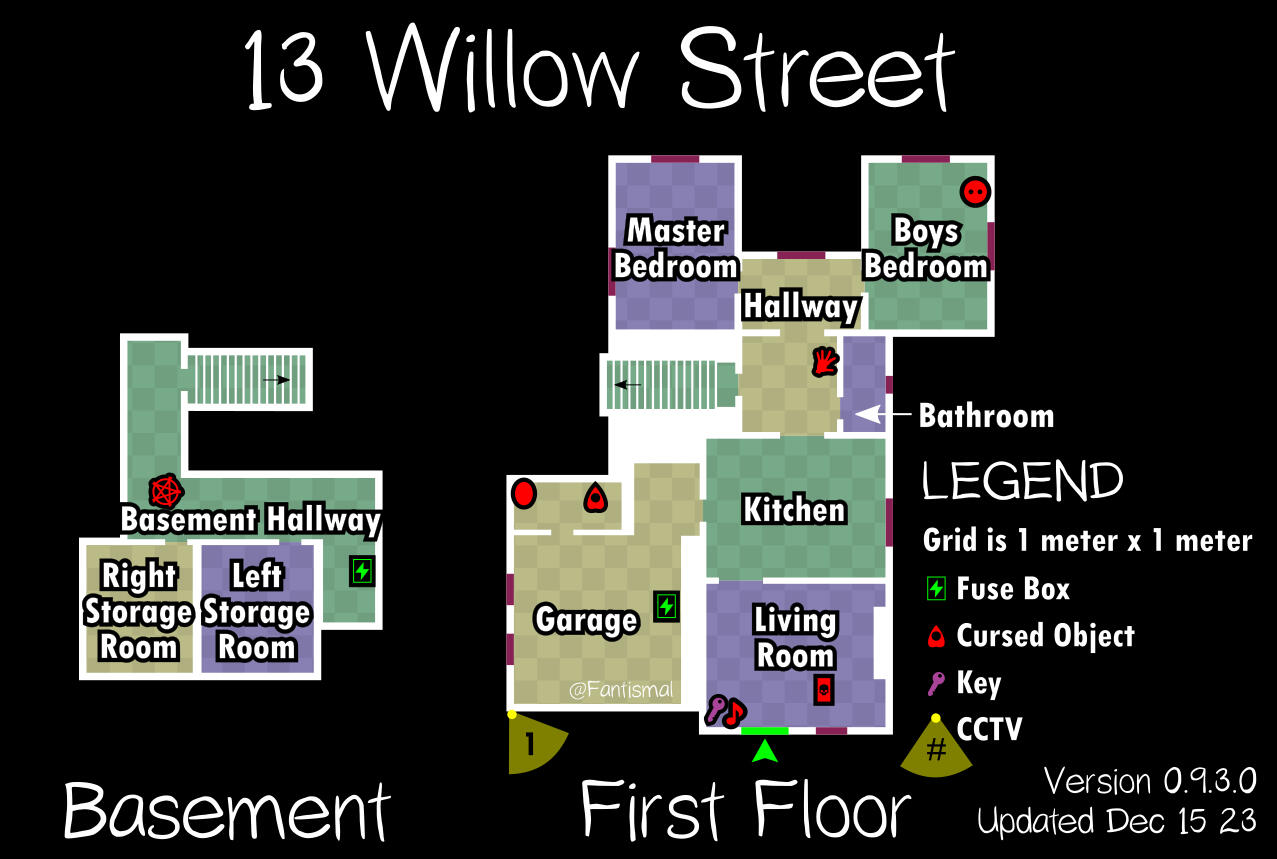
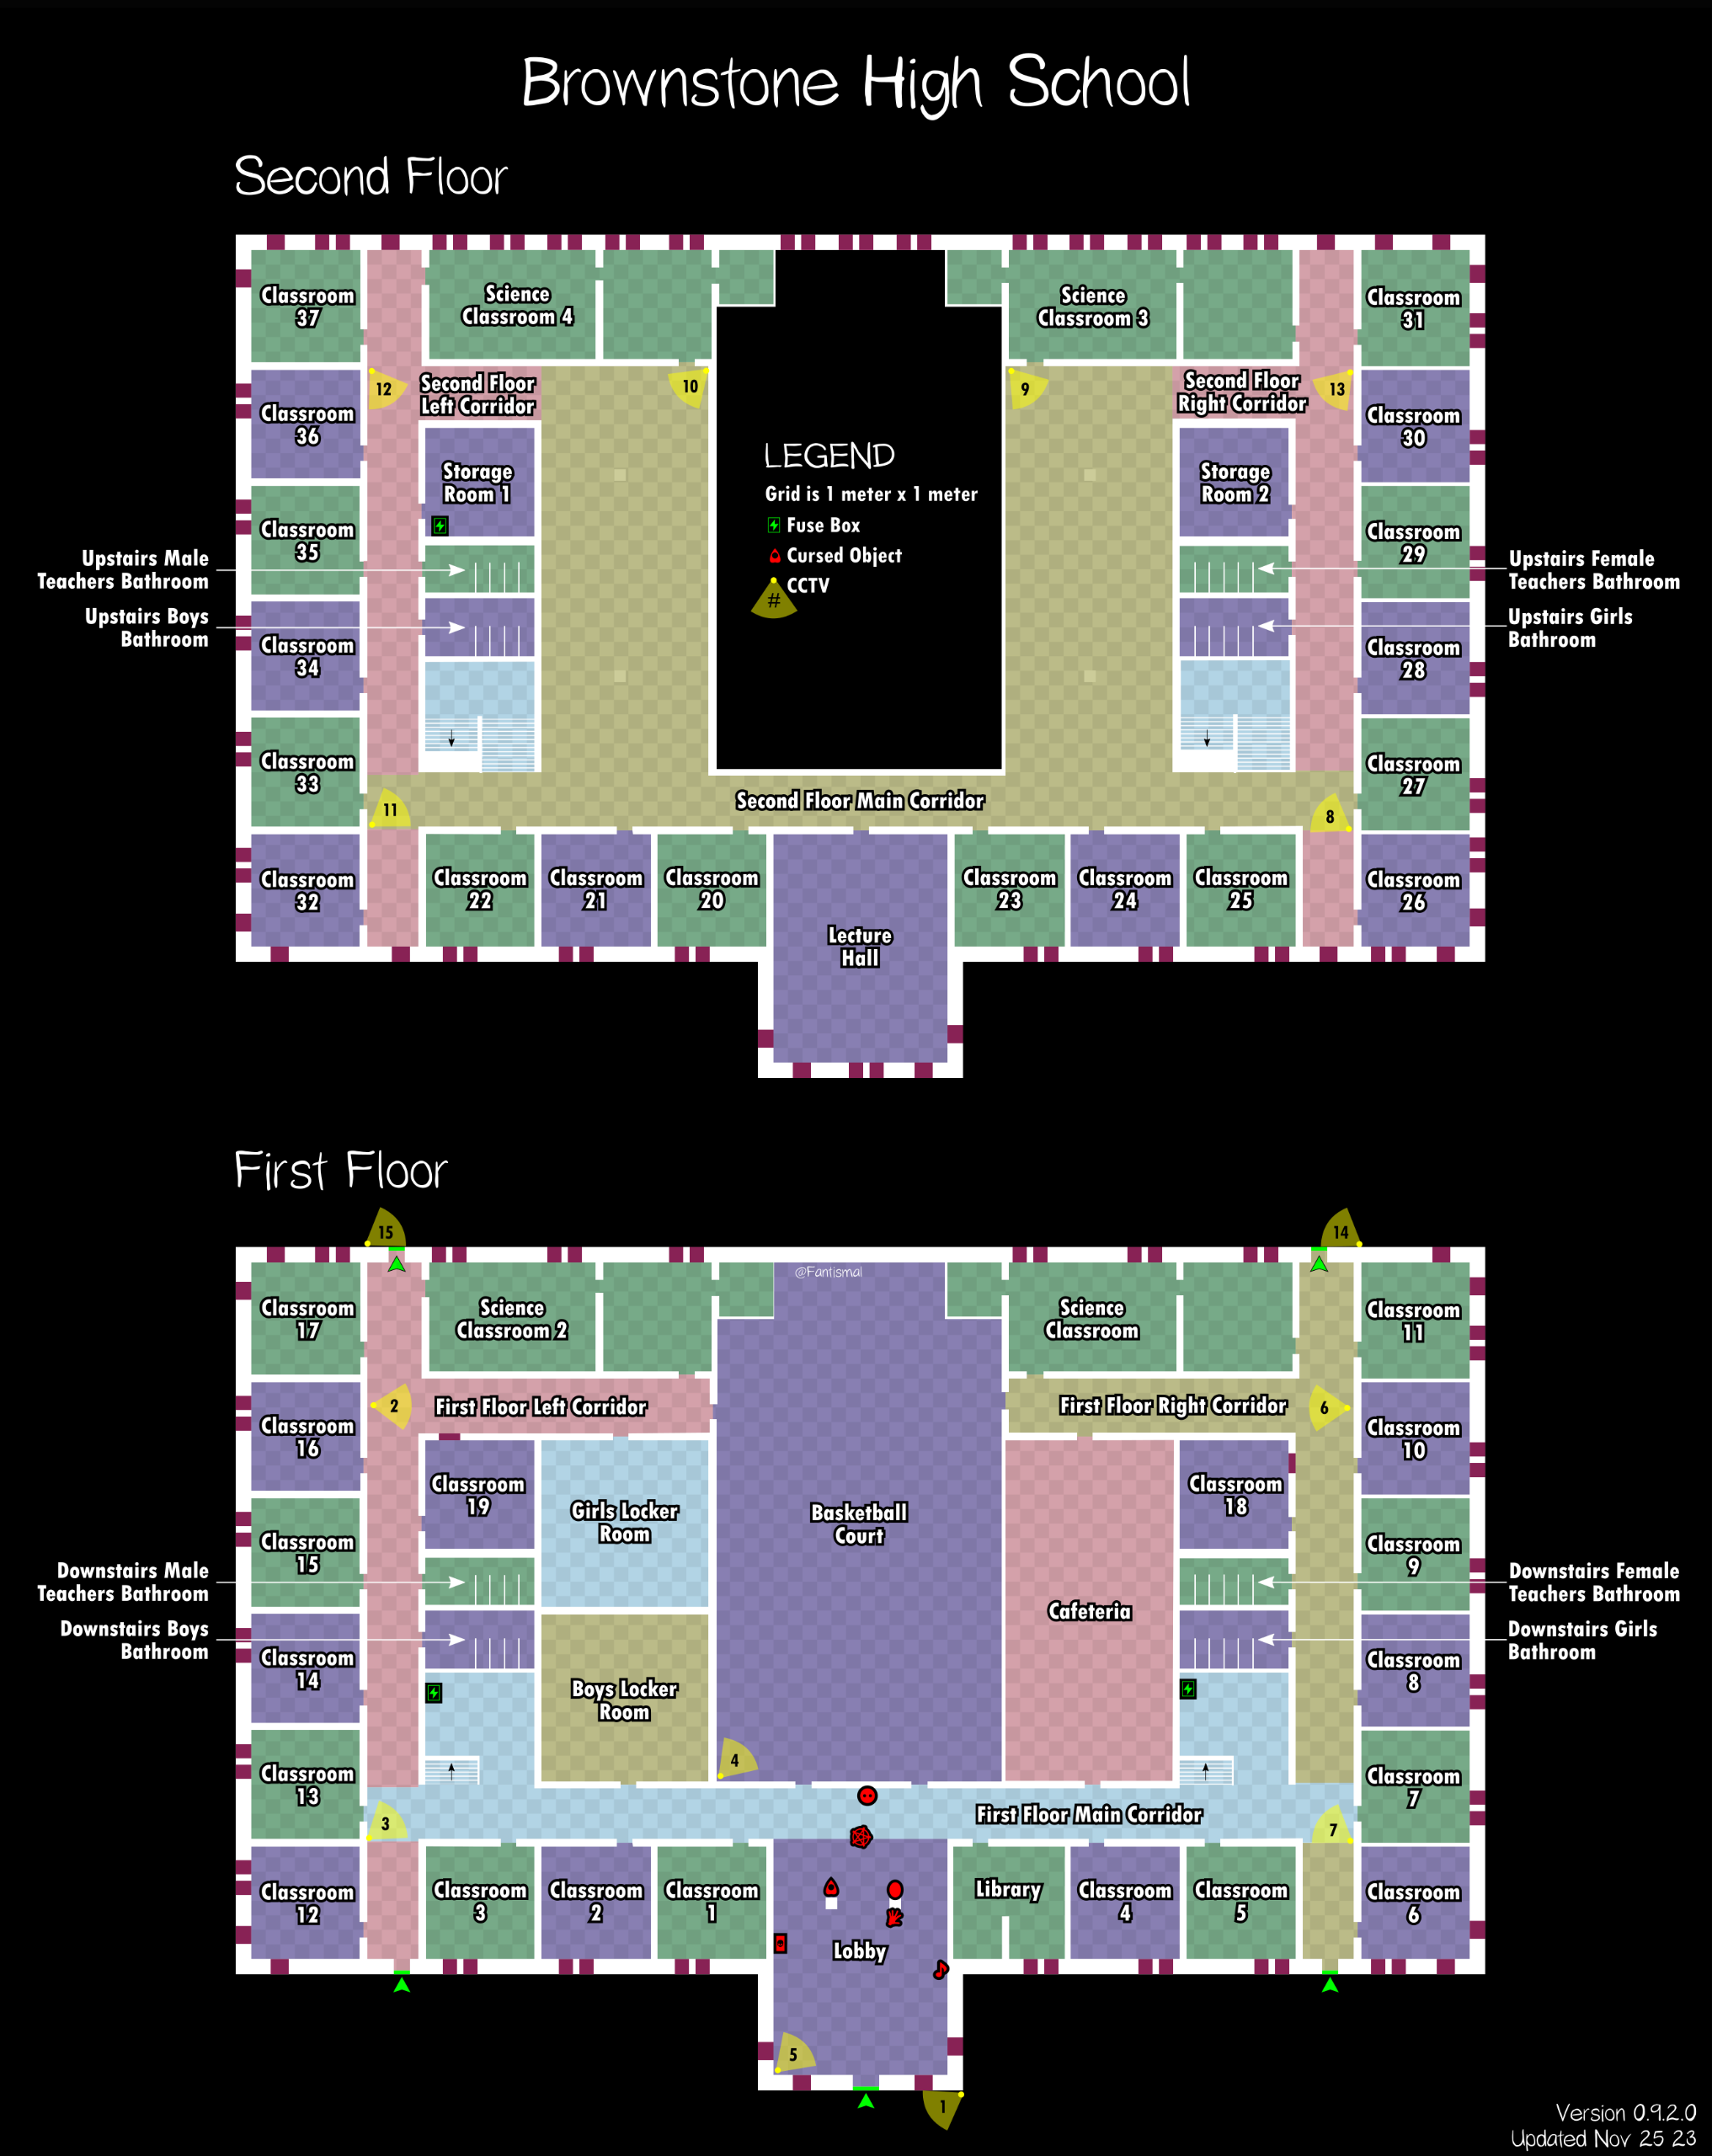
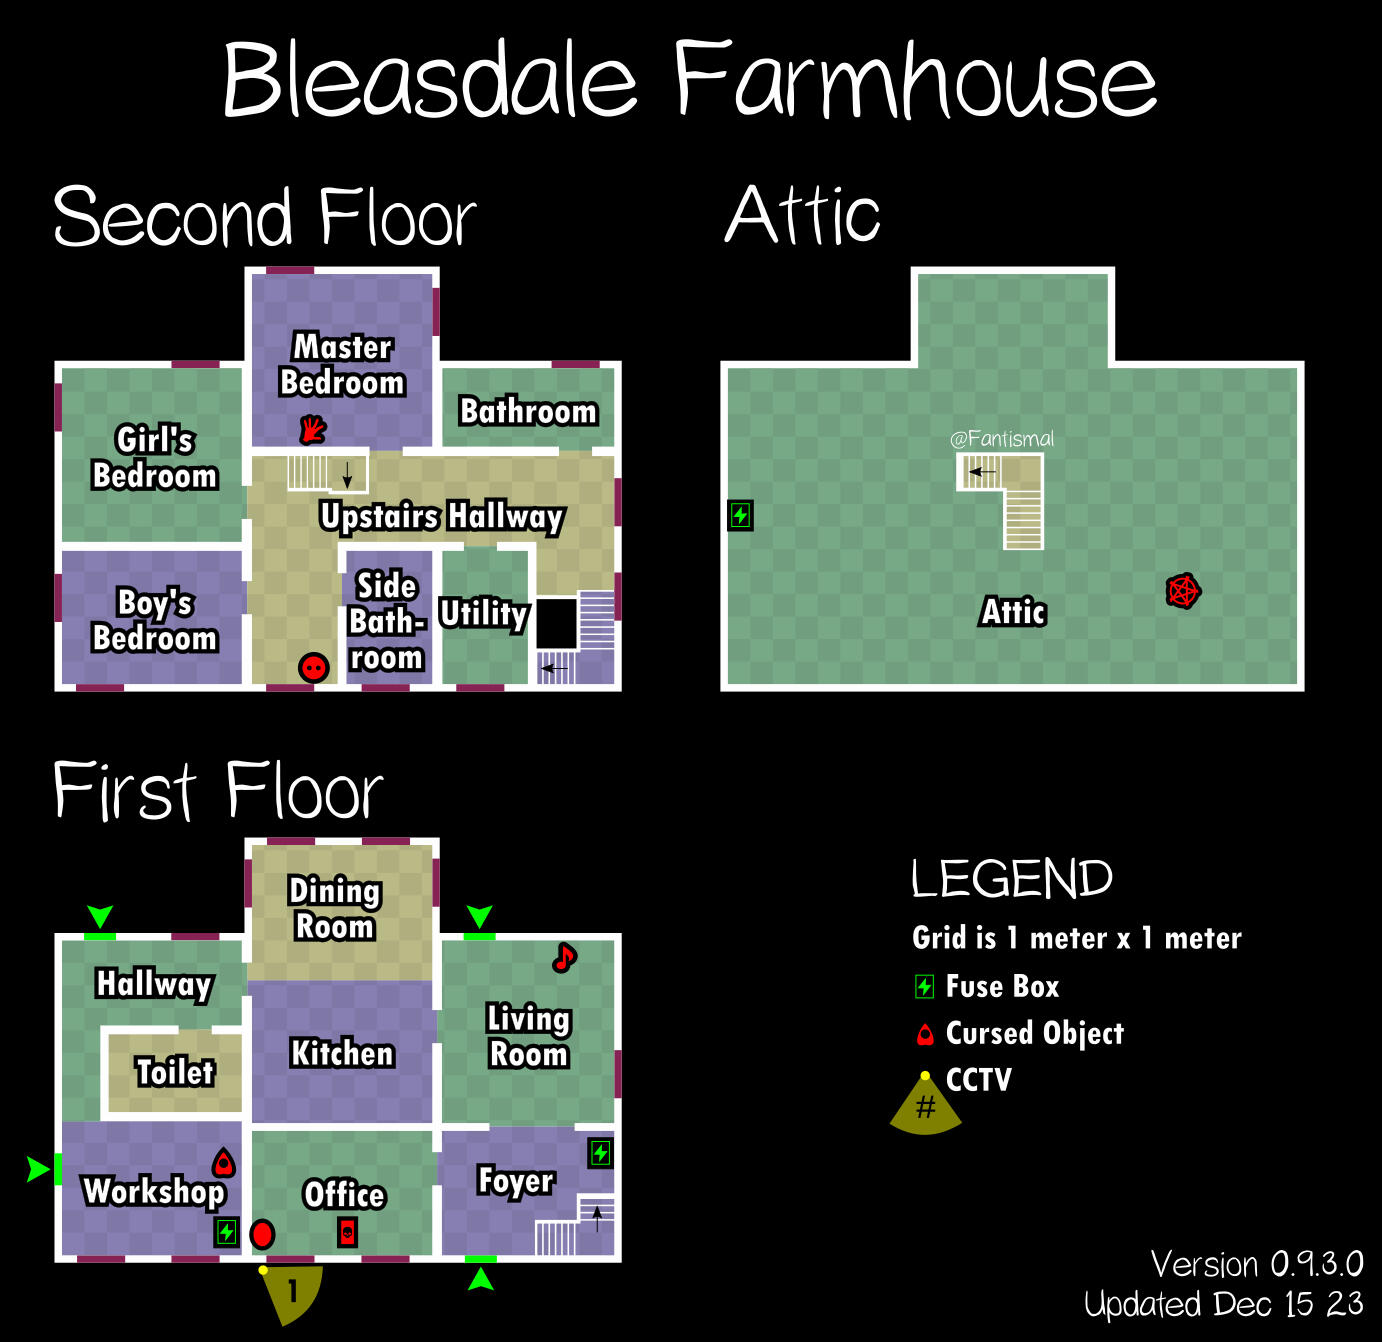
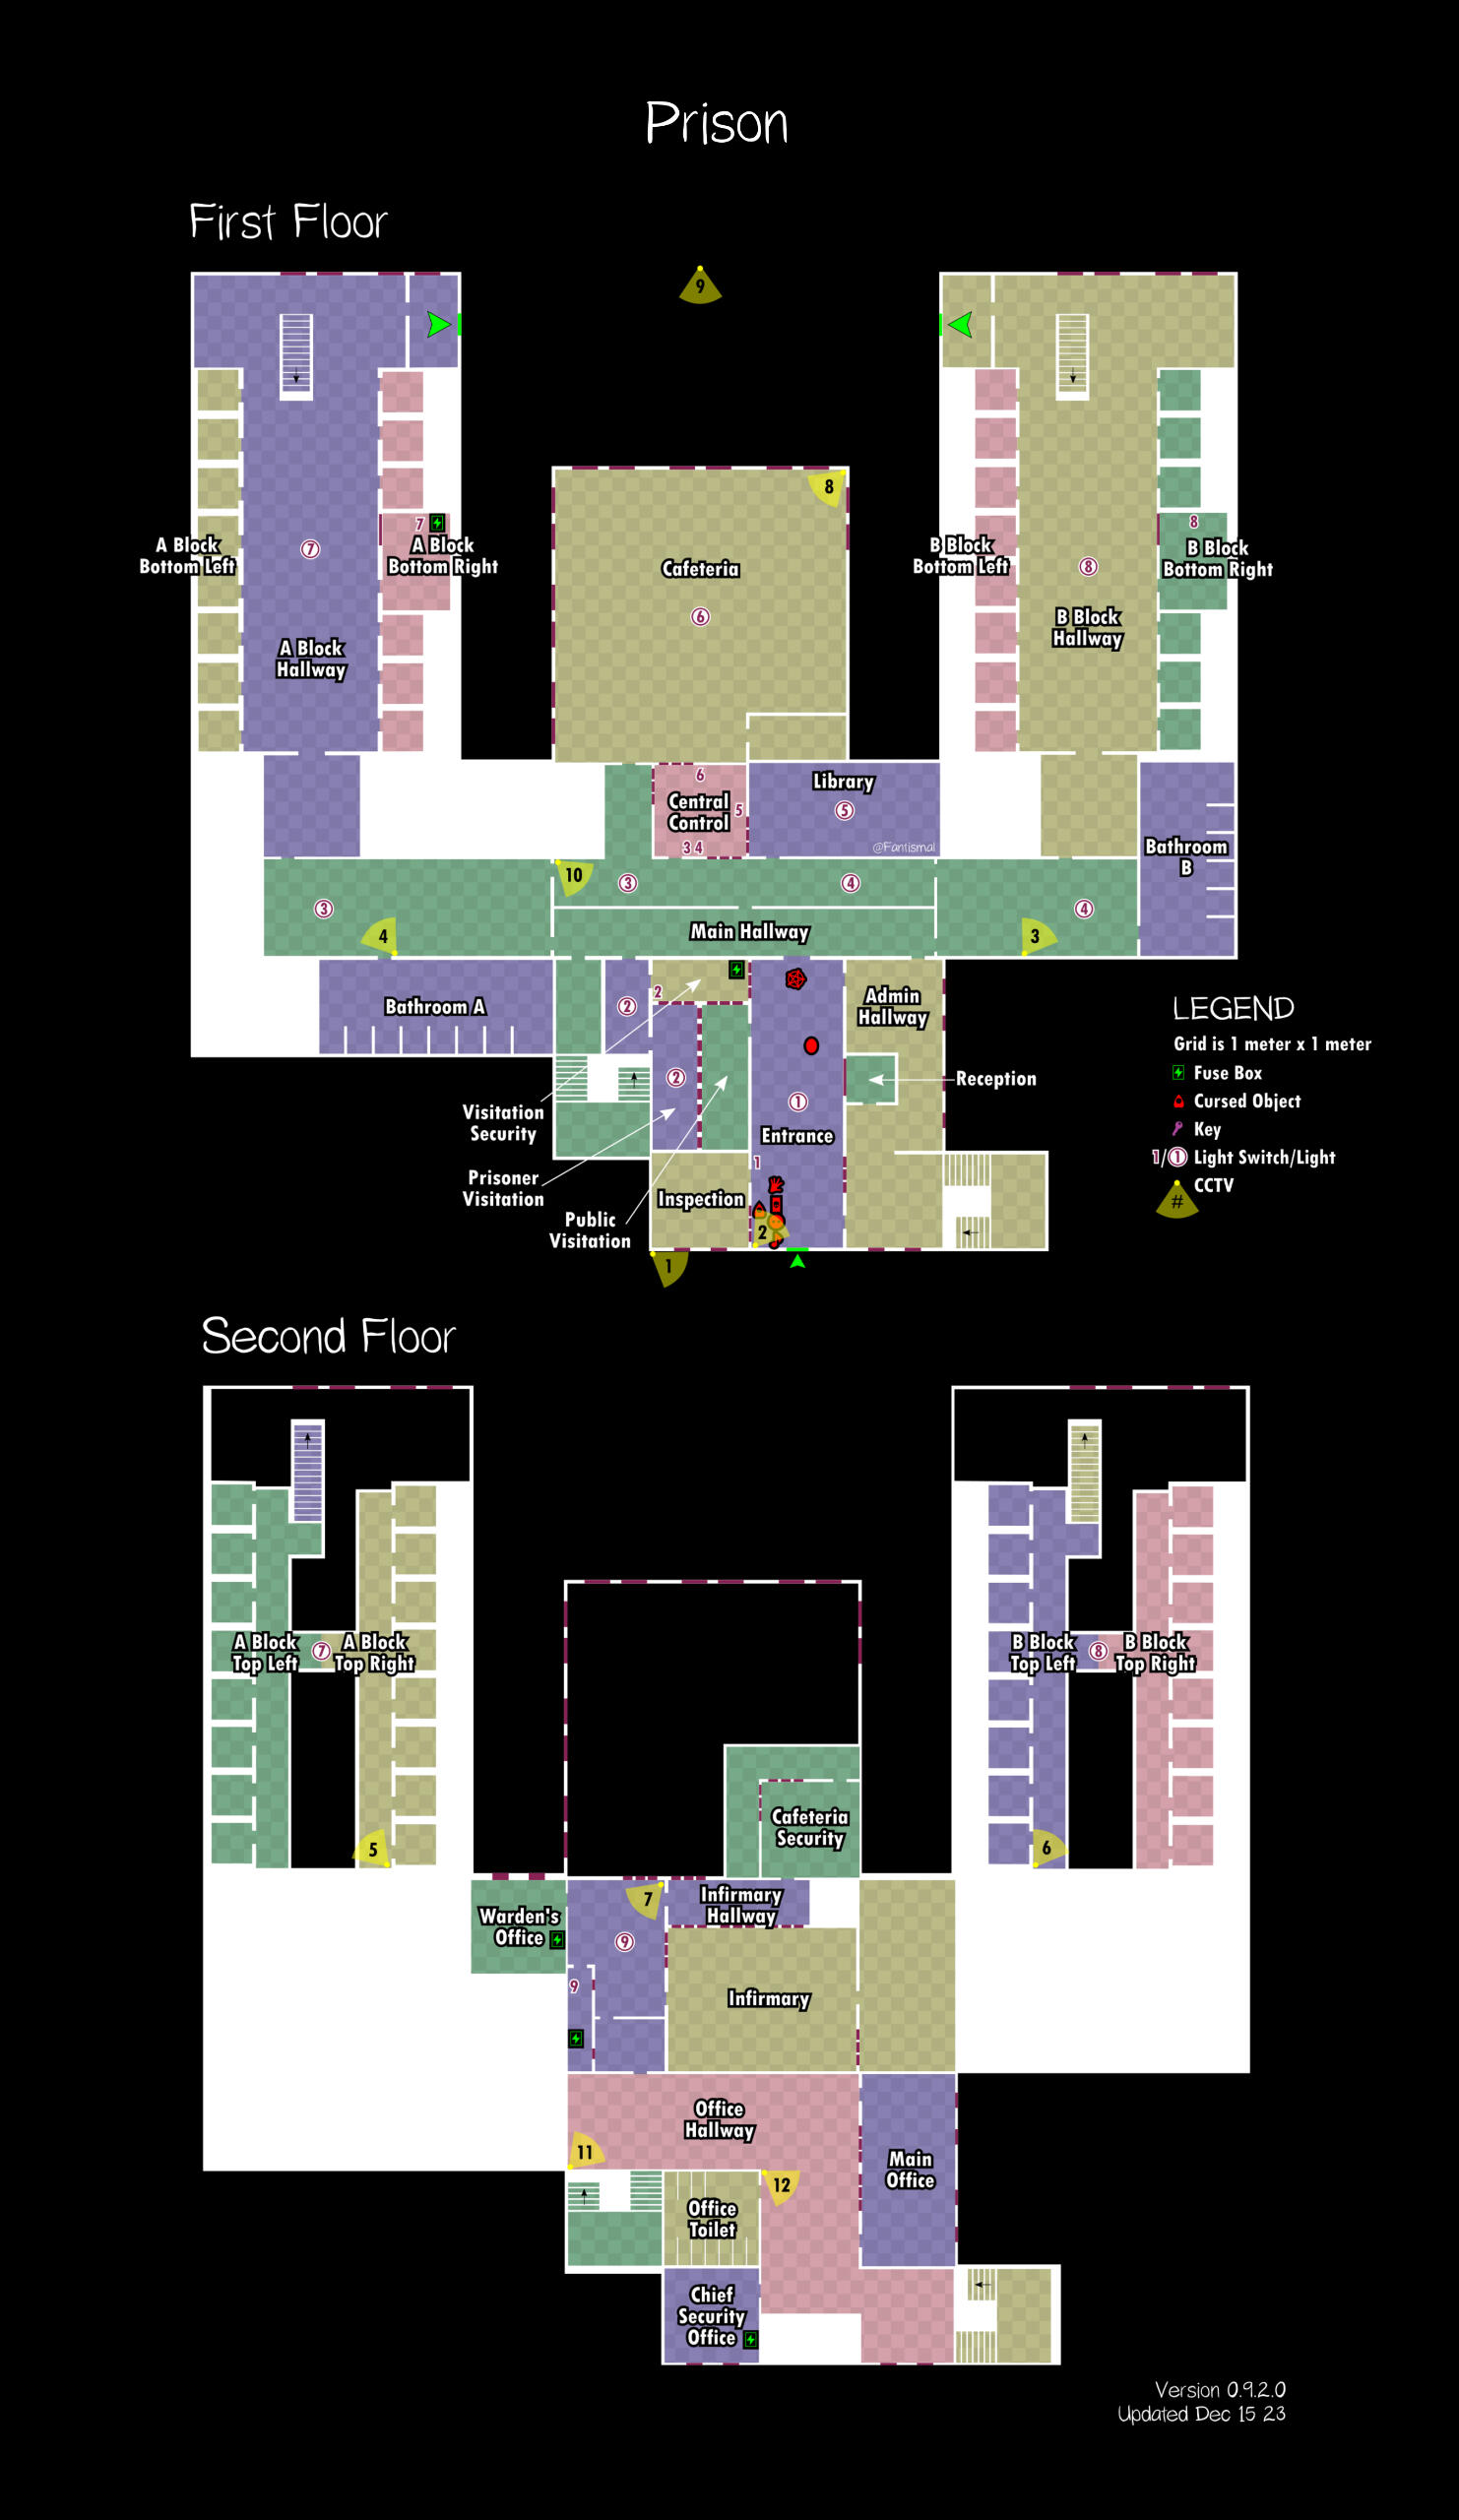
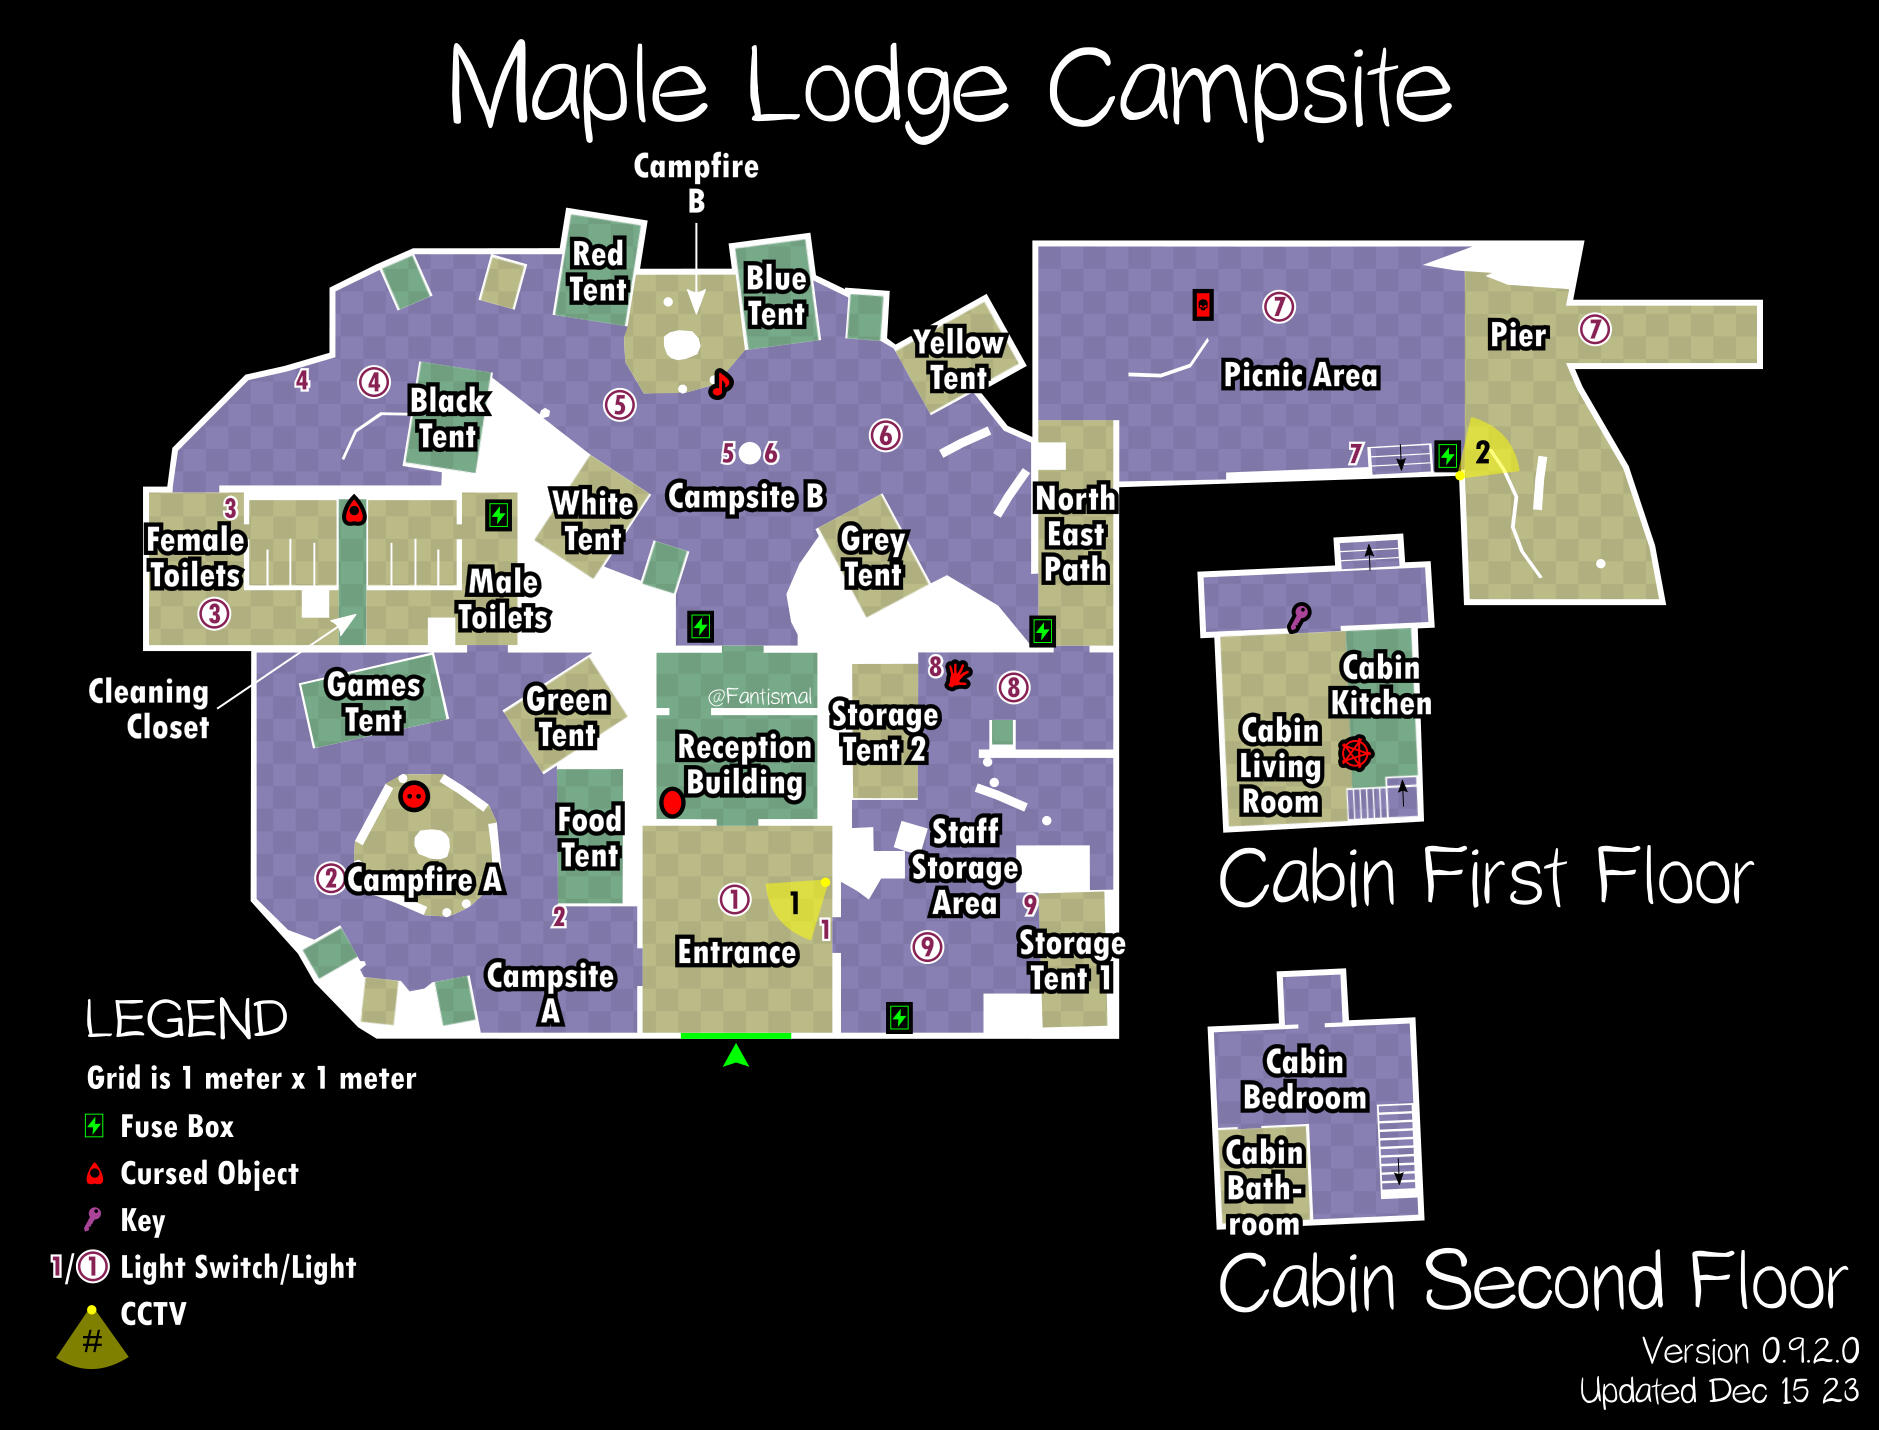
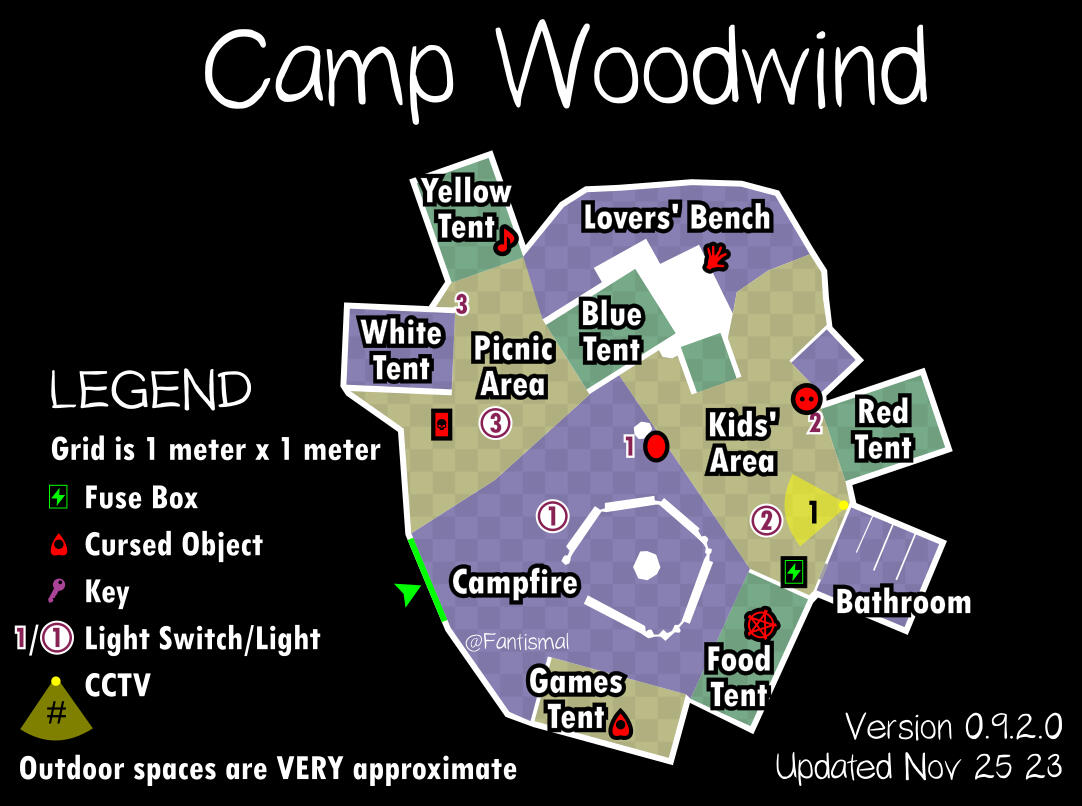
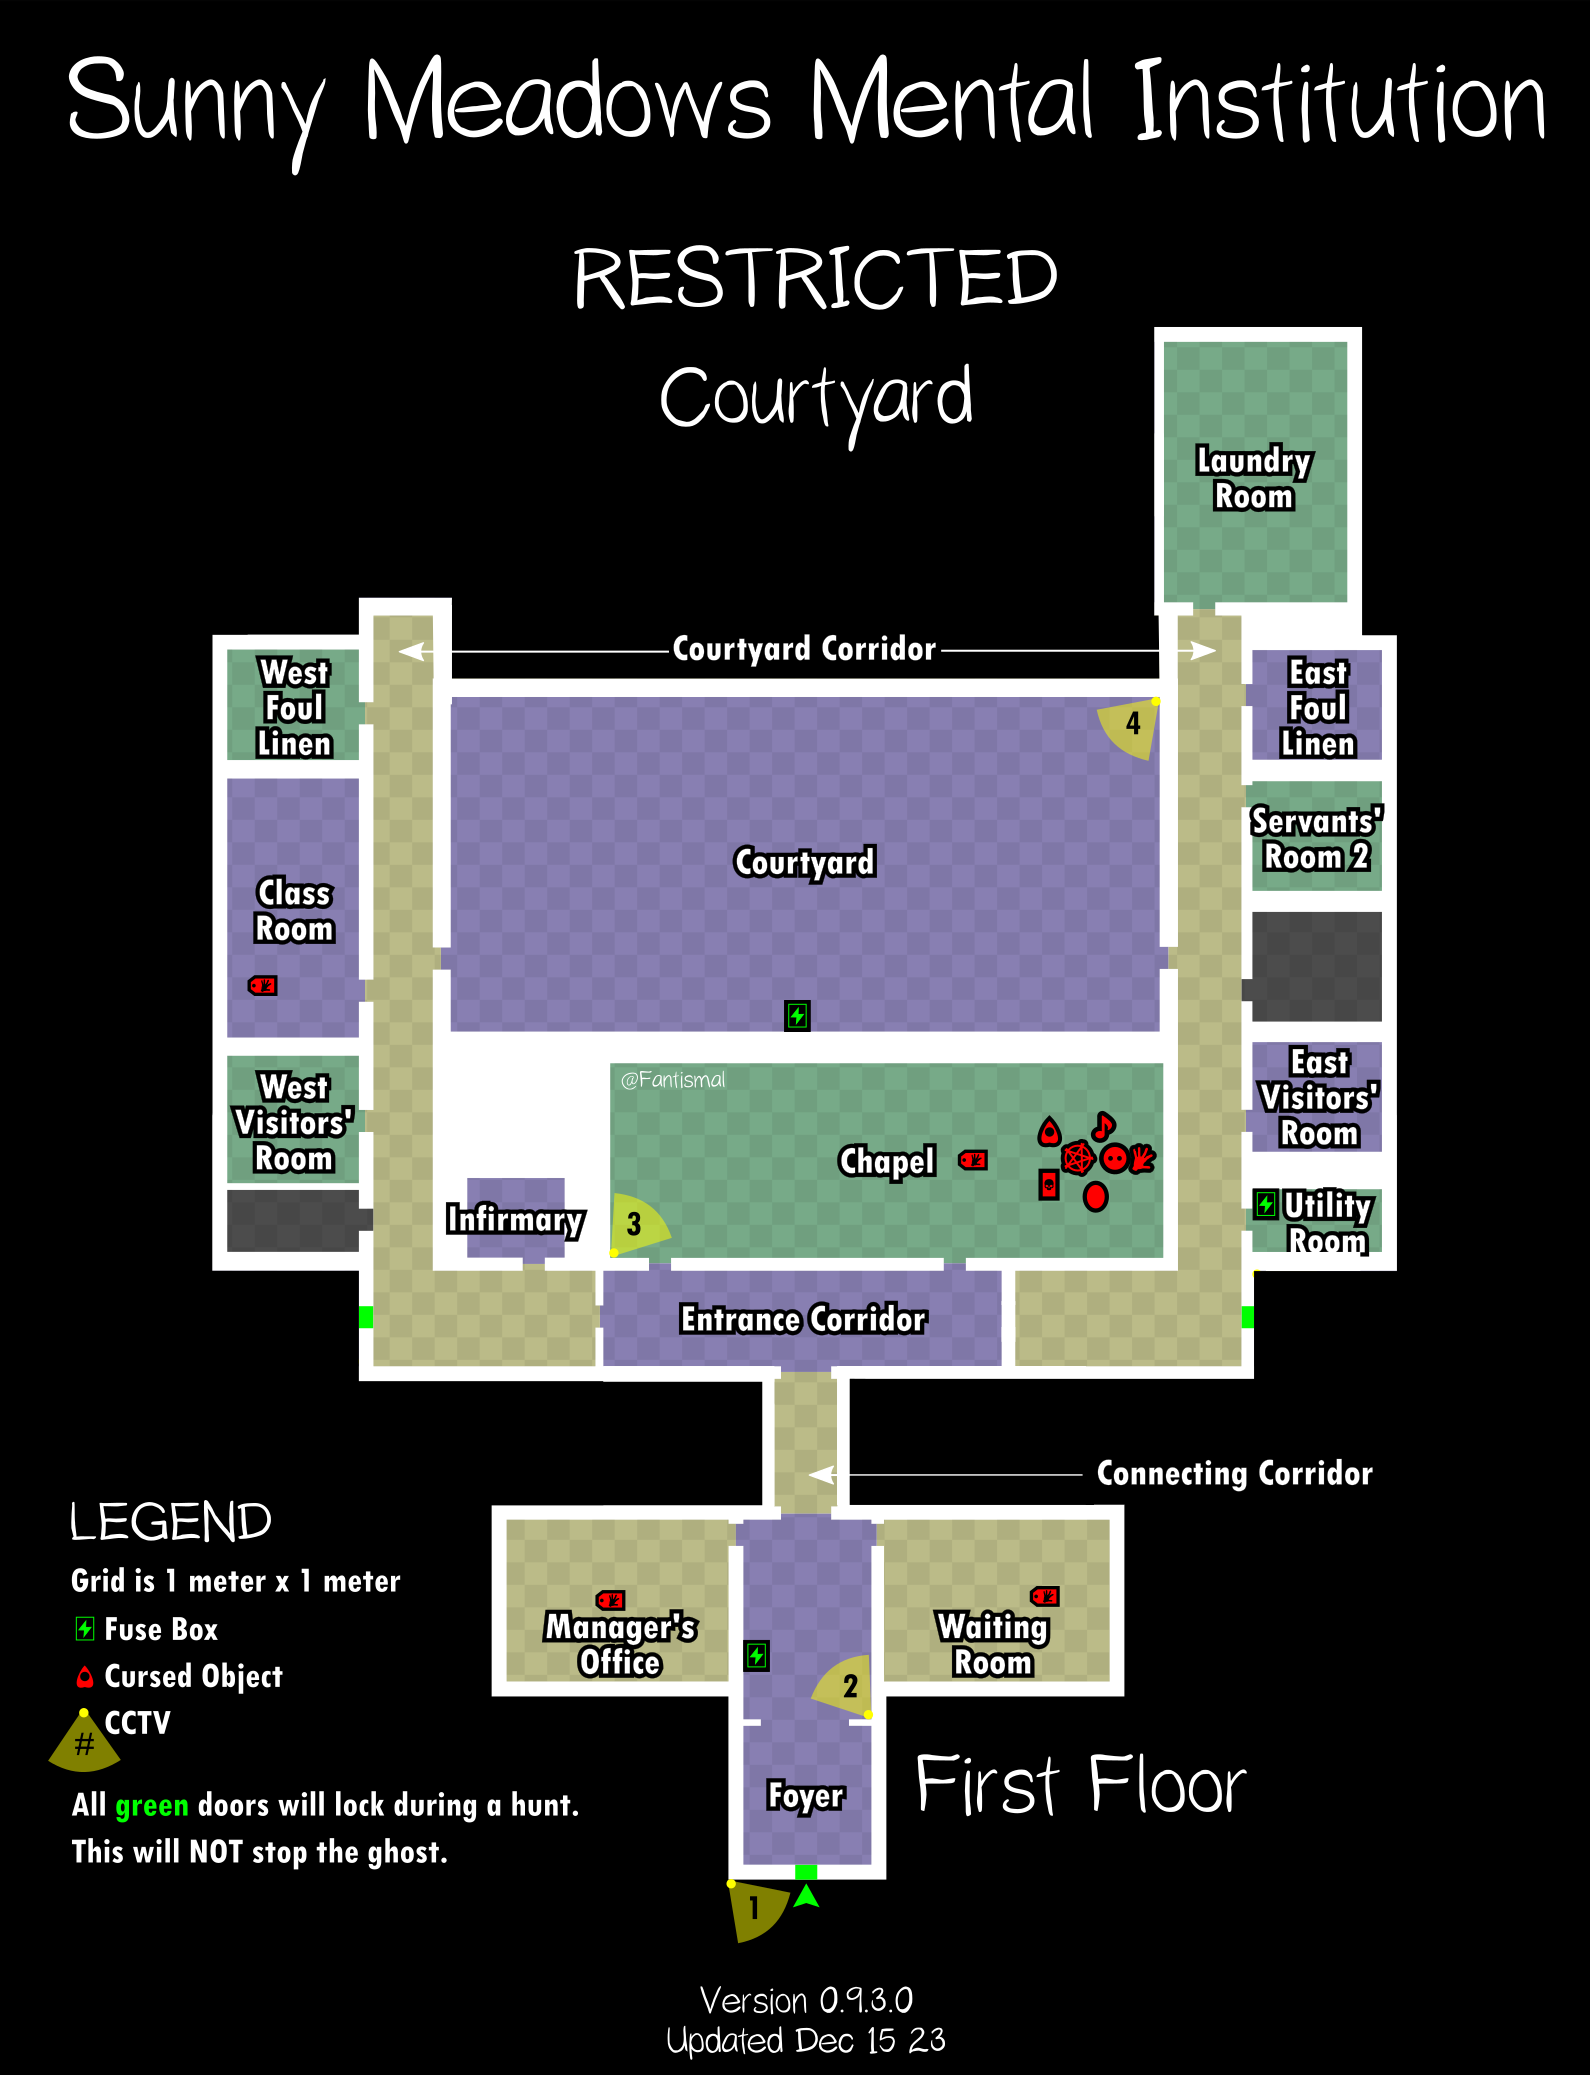
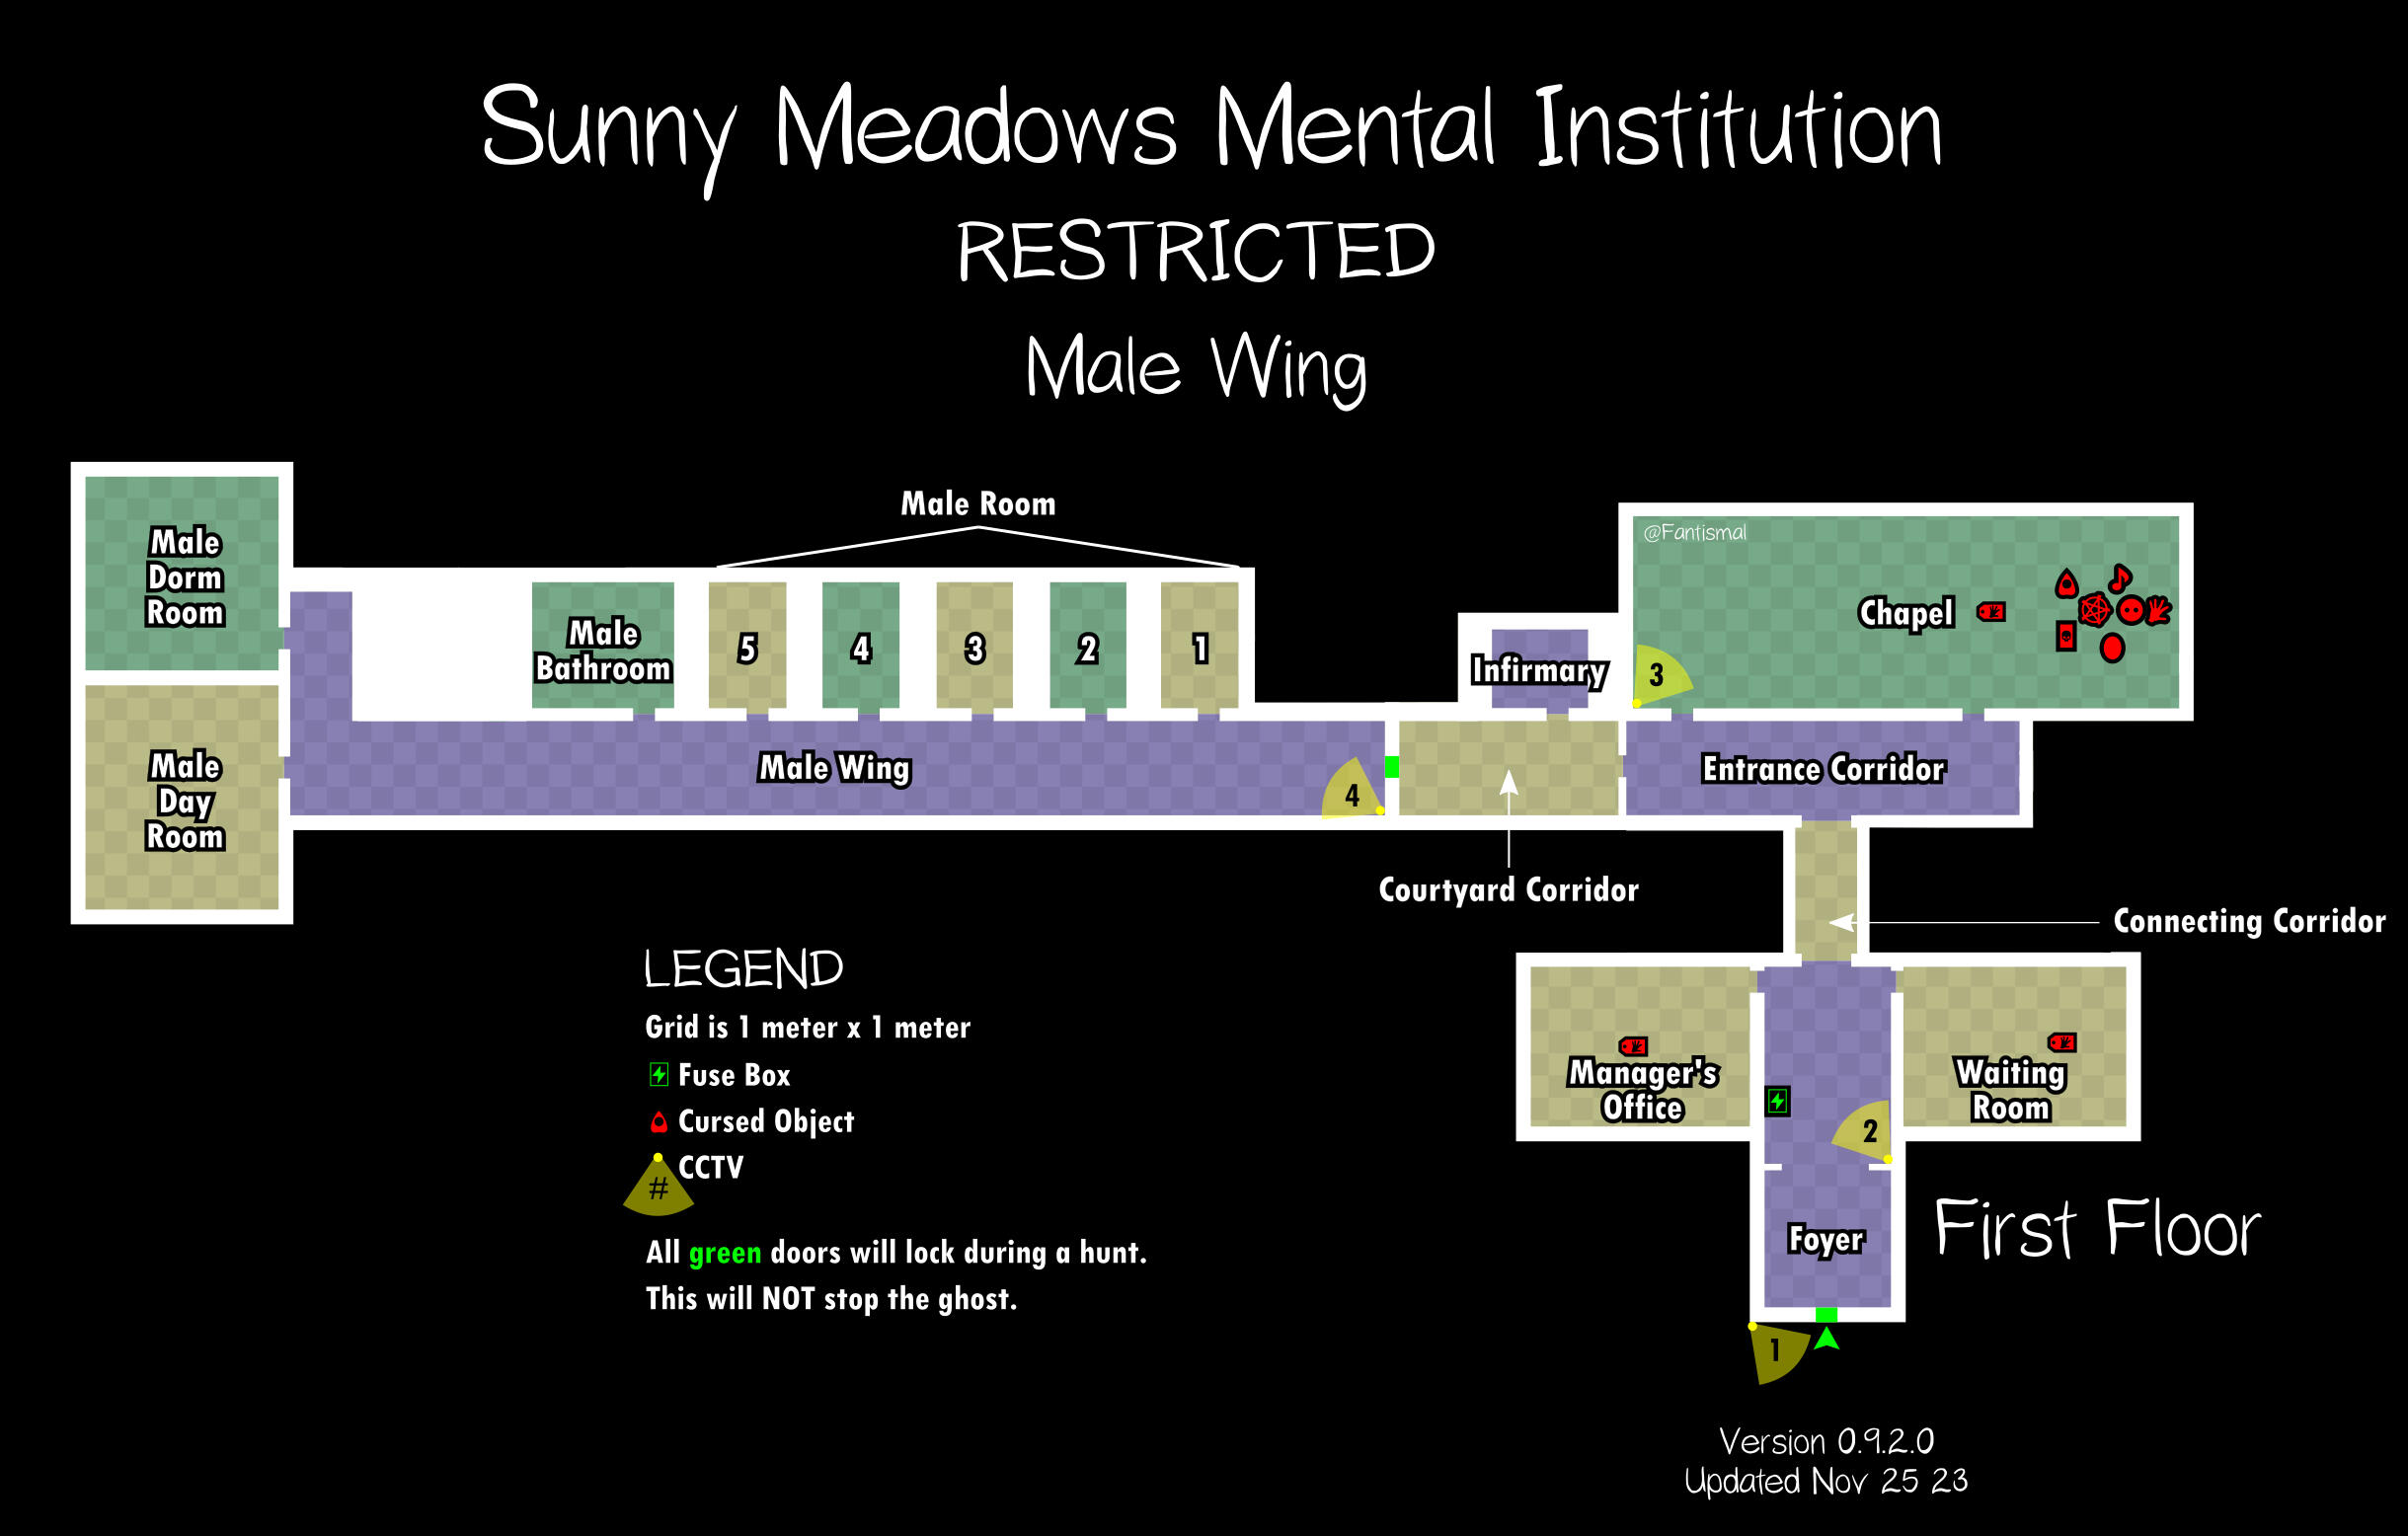
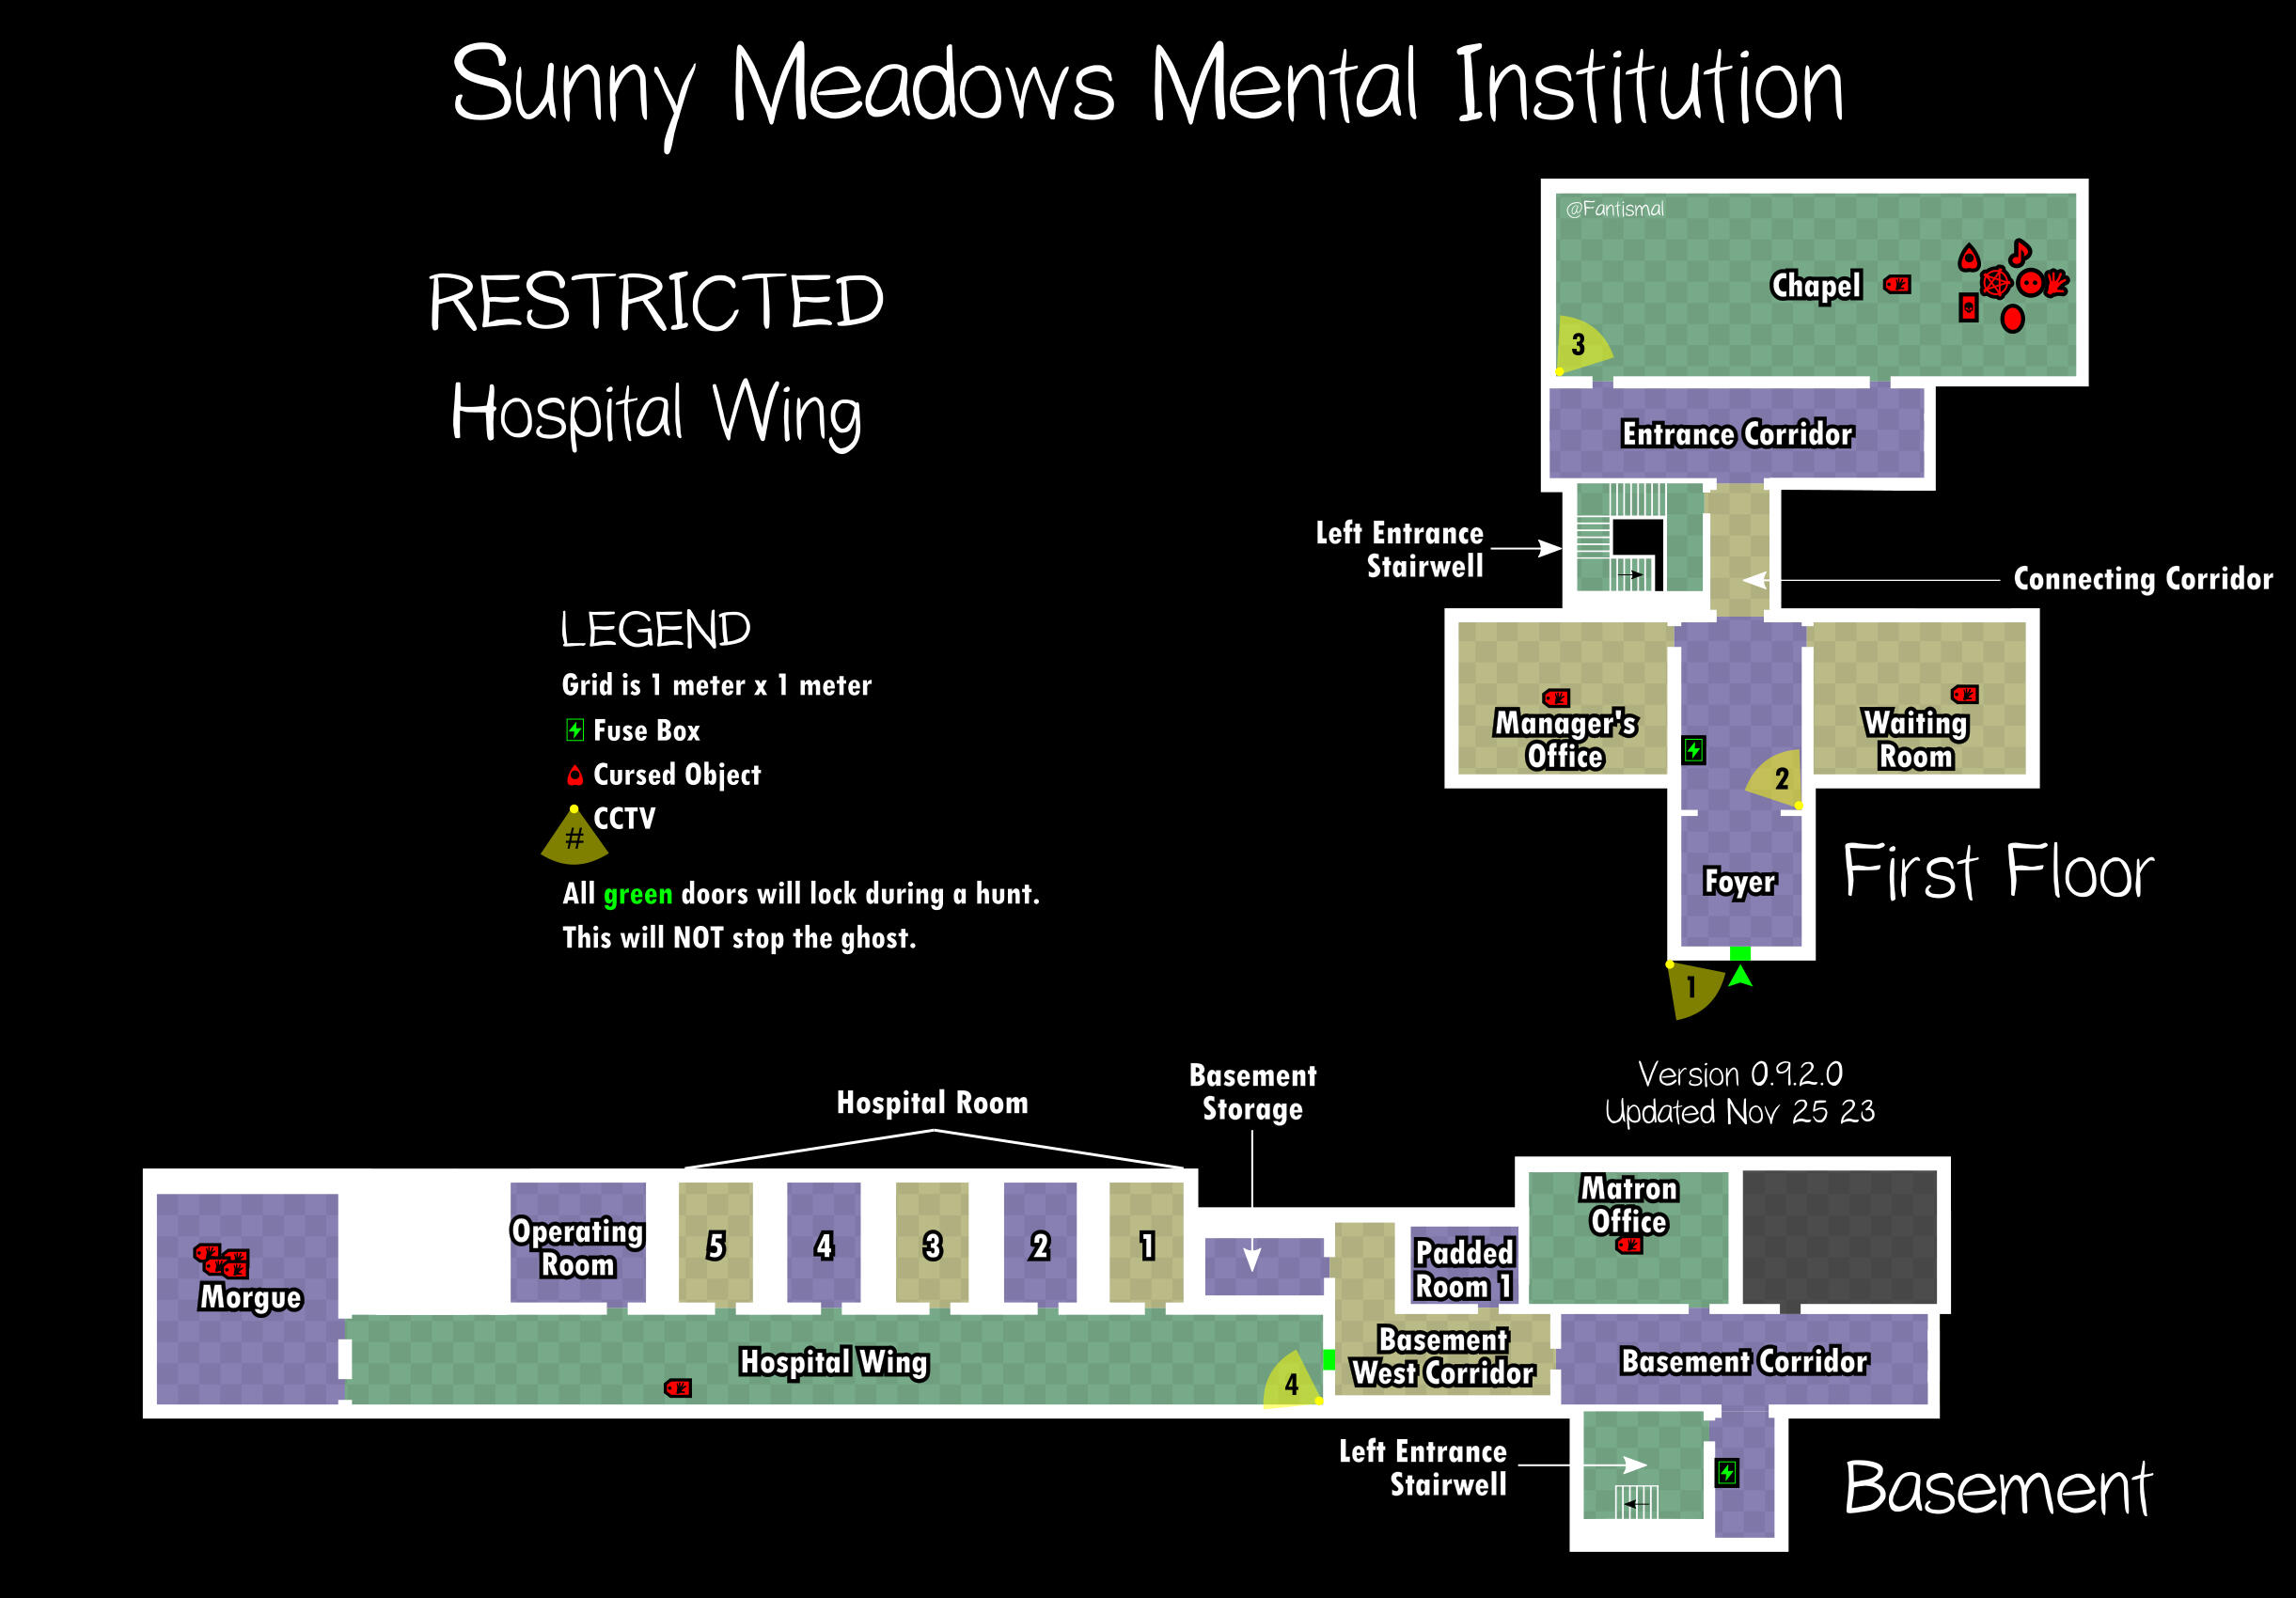
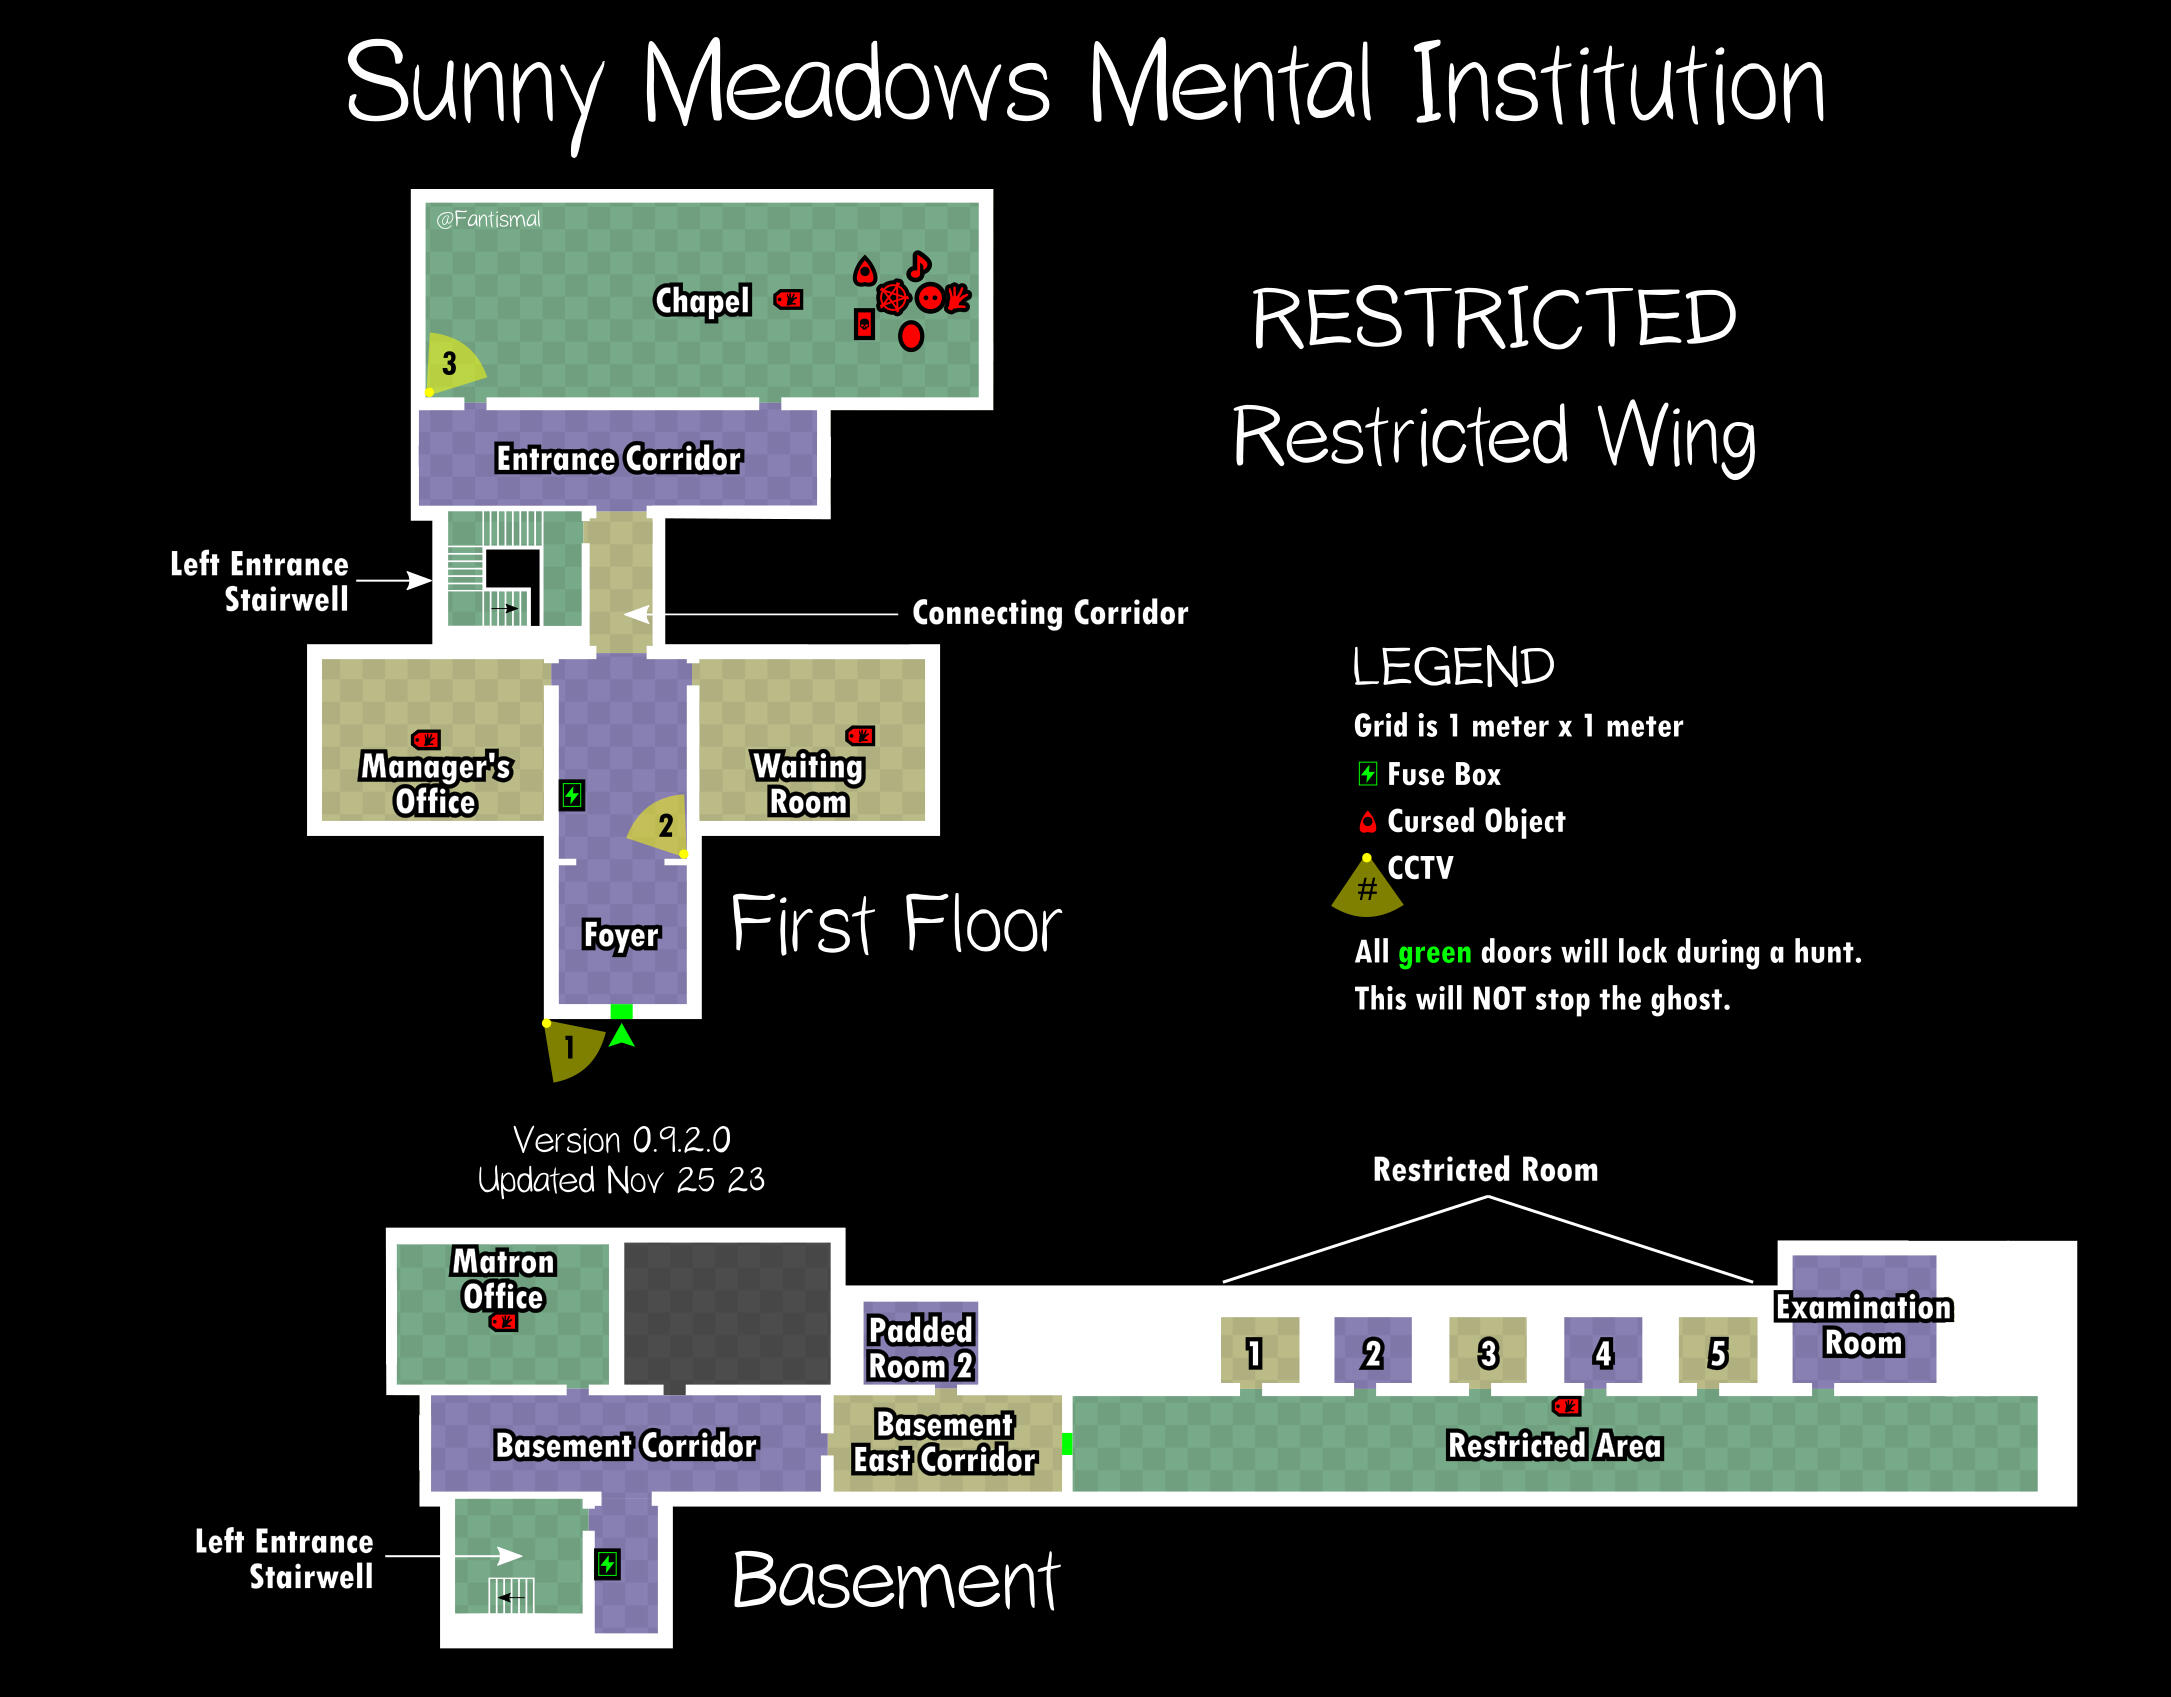
Map Layouts
Each Map is made by @Fantismal


Sanity
Sanity contributes towards certain actions being performed by the ghost. For example, if the displayed average sanity is below the ghost's hunt sanity threshold, it may decide to initiate a hunt even if the sanity fluctuates again to a higher level.Once an exit door has been opened, players' sanities will begin to be able to drop, subject to certain factors listed below. Sanity affects several gameplay aspects such as ghost events, hunts, and flickering lights. Lower average sanity results in increasing the relative frequency of such paranormal activity, though as there is a high degree of randomness in these occurrences, to begin with, this may not always be readily apparent over the course of an investigation. Individual sanities are not taken into account for these effects in most cases, meaning that a player with a high sanity level going inside may still face more aggressive behaviour from the ghost if their partners staying outside all have near zero sanity.Dead players' sanities are not included when calculating the average team sanity.During the Setup Phase, sanity cannot go below 50%, regardless of the source of sanity drain.
Sanity Gains
• All light sources reduce the rate of sanity drain. Light switches and candles work. Flashlights of any kind and lit screens will not work.
• Sanity pills restore between 0% to 100% of individual sanity depending on the difficulty over some time.
• Drawing the card The Sun sets the player's sanity to 100%
• Drawing a Wheel of Fortune that burns green reduces your sanity by 25%.
Sanity Losses
• When a player dies, all other living players will lose 15% sanity.
• If the Banshee performs a singing event on its hunt target and collides with the ghost in this manner, it loses 15% sanity instead.
• Colliding with the Oni during any form of ghost event deducts 20% sanity instead.
• The Jinn will occasionally use an ability that drains the sanity of nearby players by 25%, which can only be used if the breaker is turned on.
• The Yurei has a somewhat similar ability, with a rate of 15%. The Yurei's ability is done when it fully slams a door and is applied to nearby players.
• Being cursed by the Moroi, caused by a response on the Parabolic microphone or Spirit Box, causes the player to double their passive sanity drain, and lights will not negate this sanity drain.
• Being within 10 metres of a manifested Phantom while in line-of-sight further drops the player's sanity, by 0.5% per second.
• When the Poltergeist uses its ability to throw multiple items, the sanity of nearby players will decrease by 2% times the number of objects thrown.
• Each usage costs 20% sanity or 7.5% per second, whichever is higher.
• Using "I wish to be sane" sets all players' sanities to 50%, and increases the passive sanity drain rate by 50%. Using any weather wish reduces sanity by 25%.
• Being within 2.5 metres of an active music box drains sanity by 2.5% per second.
• Each question asked deducts a certain amount of sanity from the player.
• Each candle lit deducts 16% of sanity from nearby players.
• Drawing the card The Moon drains the player's sanity completely, setting it at 0%
• Drawing a Wheel of Fortune that burns red reduces your sanity by 25%.
• Each pin deducts 5% sanity, except for the heart pin which deducts 10%.